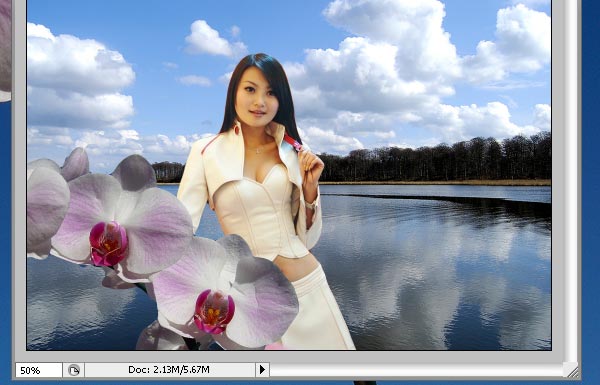
I really like the rainbows and compositions combined from flowers and beautiful women, so today we will be making a composition titled “Welcome to Thailand”. We will make a combination based on 3 simple photos, work with Curves, Brushes, Layer Styles and Blending options. This tutorial is suitable for beginners as well as advanced users and if you have any questions, please feel free to leave a comment and ask, I will be happy to help you out, if I can.
We will be making this (full view)

Ingredients:
Step 1:
As always the first step for creating a composition is cropping out the main characters, so using the magnetic marquee Tool or Pen Tool (whichever you find more useful), crop the lady out…

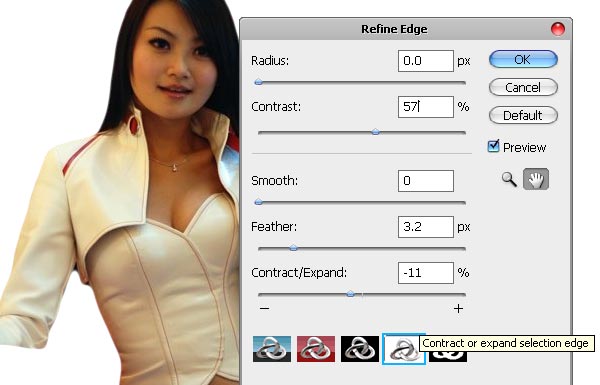
if you are using CS3 + version of Photoshop, it will be much easier for you to follow our today’s tutorial as a lot of features we are working with are simply unavailable in previous versions of Photoshop. One of them is the “Refine Edge” facility. Once the selection is loaded, go to refine Edges and add apply the following settings. Please note that setting vary depending on the selection you have made, let alone photo you are working with. if you used Magnetic Marquee Tool for cropping, use the same settings as we have here:

Step 2:
Next step is go to Levels by pressing Ctrl + L and apply these settings. Our purpose is to make the image a little more professional looking by adding light since the original image is extremely dark and pixelated. We will refine our photo by working with Curves and Levels, but lets start with levels, to get an overall lighter hue:

Step 3:
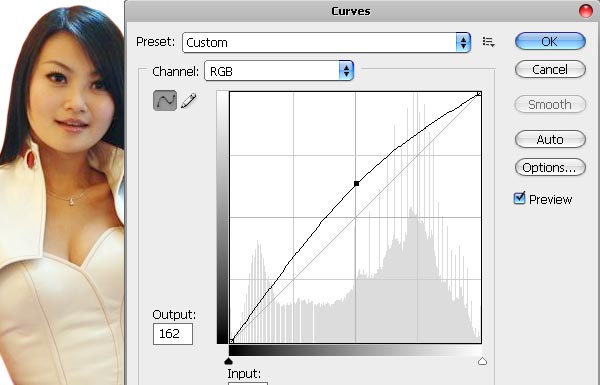
Next, go to Curves and using the RGB channel, lighten the image up, just the way you see on the illustration below:

Step 4:
Right now it looks far more professional, less dark and more vivid, almost like a real studio shot. it’s time to take the second image from our stock for this tutorial, the sky shot, and place it on your canvas, just below the cropped lady image.

Step 5:
Also, crop the orchids just the same way as you did with the lady and place the flower on your canvas.

Duplicate the cropped orchid’s layer and place a few of them around the lady. We placed one on the front and the other behind her, so create the illusion as if she is surrounded by these gigantic flowers.


Very well written… Great tutorial, Appreciate your efforts. Thanks! 🙂
-Deepu
Thanks a lot, Deepu!
Very interesting use of layers, color, and a theme on tourist-oriented media…. But where is the PSD file to get the swirly flourishes for later use? I like those ones shown. Best wishes, and a wonderful 2010 to all!
-will
Oh, so sorry about the PSD, I forgot to add it. Fixed now, please refresh the page and download 🙂
Best wishes for you in the new year too, Will!
Good, beaatufil efect armoni
Sooooooo Cuuuuuuuute Thaaaaaaanks
I love your site I love the whole program in fact im gonna try it myself to see if its hard to create colors are awesome.
Thanks for showing me how to do it.
Richard
Doing the tutorial right now I downloaded the brushes but it says it’s not compatable with my PS I have CS4.
Hi, what is not compatible, the brushes..?
Great tutorial, thank you so much! Keep doing such things 🙂
it’s great… i like
thanks for inspiration
regards
heru
Wow man, this site is B-E-A-U-T-I-F-U-L! Good job.
For anyone serious about photoshop check this out (USA only) http://bit.ly/psoffer
[…] 24. Design Thai-Styled Angelic Artwork From Ordinary Photos […]
[…] Design Thai-Styled Angelic Artwork From Ordinary Photos […]
[…] Design Thai-Styled Angelic Artwork From Ordinary Photos […]
Thanks for the great info. I love your whole sight. I’m disabled and trying to start a photo editing business just to have something to do. I would love any advice you want to share.
[…] Design Thai-Styled Angelic Artwork From Ordinary Photos […]
Thanks, can’t wait to try this one!
My cousin recommended this blog and she was totally right keep up the fantastic work!
Links…
[…]Sites of interest we have a link to[…]……
[…] Автор: Lorelei Перевод: Игорь Арония. Ссылка на источник […]
[…] Источник: loreleiwebdesign.com […]
[…] Design Thai-Styled Angelic Artwork From Ordinary Photos […]
Very professional. clean and simple design and very easy steps.