Step 1. Choosing a photo.
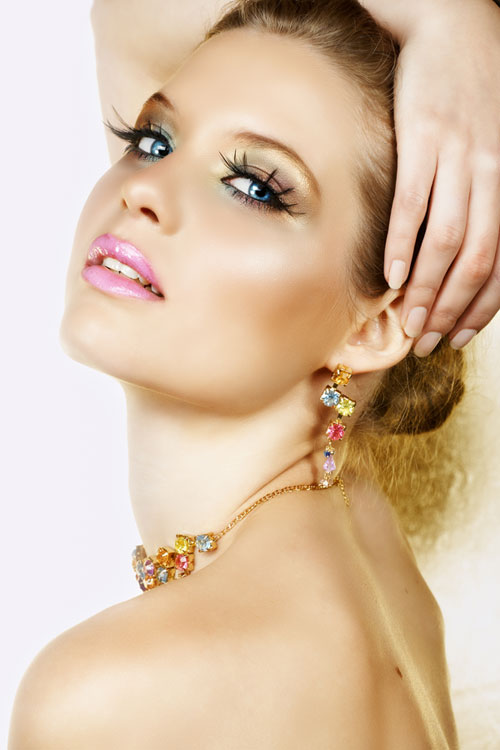
Since we are going to make a perfume commercial, we will be working with a glamorous portrait photo. Here we are using a paid stock, hence we cannot offer a psd file for a download.
Step 2. Applying Infra Red Filter
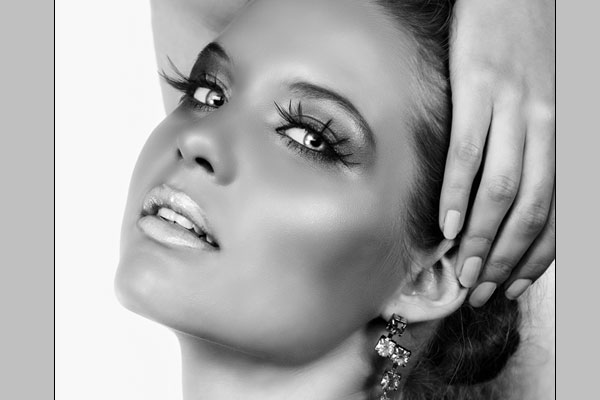
A lot of people are not aware how to process photos using the infra red channel, even though it’s actually very easy. Your photo will turn black and white, but we will enhance one color at the cost of another, and this opens a very wide filed to creativity.
You can make the lips very pale, and the skin tanned (which is what we are going to do here), or we can make the skin pale, and the lips dark red. If you’d like to play more with Infra Red image processing, I suggest to download our Infra Red Photoshop Actions, it costs only $1 to buy and will allow you do image processing in one click.
So, if you do it on your own, go to Image >> Adjustments >> Channel Mixer and apply the following settings in the window that will pop out.

This gives exactly the so-called “safari effect” that was so popular back in the 70’s light lipgloss and dark skin. Although the results may vary, depending on your base photo, it will be more or less the same if the initial picture is more or less in same shades as the one we are using.
This is what we’ve got:
Step 3. Applying Sun Kissed Look
We are not looking to get a natural photo, since we are designing a commercial poster, they are all well known for being over processed, over saturated and mostly way over airbrushed!
Click on the tiny icon at the bottom of your Photoshop’s Layers Pallet, which looks like half black and half white pie (Create new filler adjustment layer). This will pop out a menu with different filler options, choose “Gradient map…”

Use the following colors: #1c1c1c as your dark one, which loos almost like black, and
#ca8c03 as yellow brown.
Apply the gradient map. Don’t forget that if you need quality UPrinting brochure printing you can check out this link.
Step 5. Adding Playful Sun Rays.
Next, we will be adding playful and cheery sun rays. This requires having some brushes in your arsenal, though we will be working withing something that came pre installed with Photoshop CS3 to make sure everyone who follows this tutorial will be able to reproduce our results.

We are using a brush called “Rough Dry Brush”, though pick a bigger size than the default one, let’s go with at least 300px, depending on you photo size. Using the white color as your foreground, chaotically apply the brush all around the girl, without touching her face, see the photo below:
After applying the dots, this is what you should get

Don’t worry about the pixelated edges of the dots, we are just off to fix it! While the layer with dots is still selected, to to Filter >> Blur >> Gaussian Blur, and apply the settings you see below:

Now, set the blending mode of this layer to “Overlay”, this will give a nice and very sweet look of sun coming through some hollowed surface.
Step 6. Choosing a photo. Adding Sun To the Face
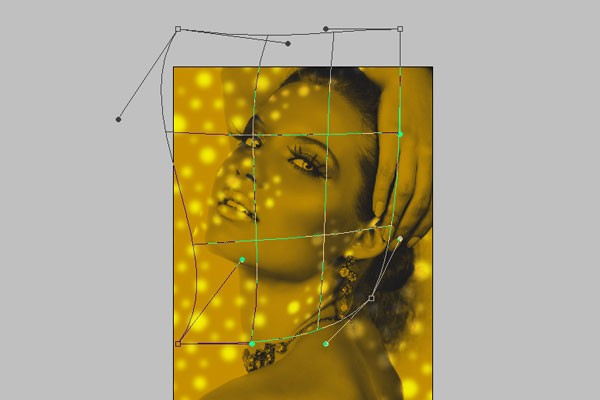
Duplicate the layer with sun rays and move it a bit, so you can go over the face. Press Ctrl + T, and right-mouse-click, to get the small sub menu, where you will choose the mode “Wrap”. Distort it as on the picture below, to get a more 3D effect of the rays spreading all over her face.
Using the eraser tool, be sure to clean up any remains of the rays that fall “outside” the face area.

Step 7. Colorizing makeup and Diamonds
Create a new layer, and using a very bright blue color #20b8d0, start adding eye shadows on top of the existing ones, or instead of any makeup you may have on the portrait. Set the layer’s blending mode to “Overlay” as well…

After you finished working with the eyes area, using the same layer and color (it’s important, so you won’t create a salad of colors on your canvas) choose a smaller brush
colorize the earnings, or the any other detail (a small detail) that you see on the photo.
We chose to colorize the stones in the earnings, that gave enough balance and worked well together with eyeshadows. Again, we are not after a natural look on this tutorial, we are making an exaggerated commercial… and this is how they are made in Photoshop.
Final Touches
Lastly, add a perfume bottle and text. you may play with blending options to get the text in the same hue as the other colors on your canvas. remember that balance and harmony is the key, even if we make something over-polished.
This is your final result, and I hope you enjoyed the tutorial. Be sure to subscribe to our feed and like us on facebook.


Hallo,
my name is Marisa and I’m writing from Italy then sorry for my English. I would like to contact you but I’ve found only this comment’s form.
I have a site with an your wonderfull template (the name of template is “Fortunes” – recently there is also a new version who’s name is “Notessa” but I’m using Fortunes).
I’s very nice but there is a problem: I’m not able to publish the comments I receive and this also if I approve the comment. The problem is from immages slide becouse if I associate an immage to the post every commet to the post will associate to the picture and not to the article… I can publish the comment only if I don’t associate any picture and I leave the slide without any immage.
Could you tell me what’s I’m wrong. How can I do to risolv the problem?
Thank you very much for the answer.
very nice effect
i like this tutorial very much
i love it…thanks for the post….
wow amazing . thanks for the post.
i like this tutorial. thanks for sharing the post.