Start off by making a new canvas, 550*200px.
Fill it with #2E5164 (grayish-blue)
Select the typing tool and type any word inside. The color does not matter. We worked with white letters, using customized MicrogrammaDBolExt font.

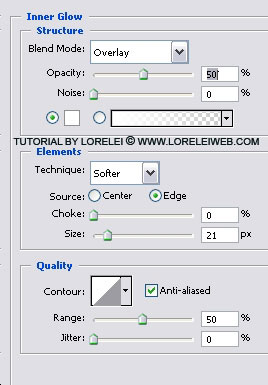
Go to layer >> layer styles >> Options and apply the following settings for

Pay attention and set the overlay settings to only 50% as you really won’t need more for this effect.
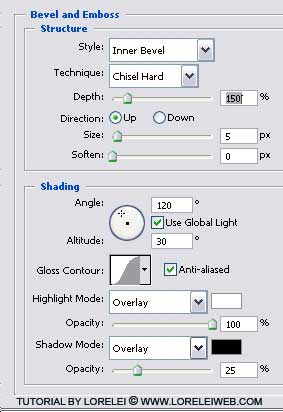
The Bevel and Emboss is pretty much what makes this text effect worth seen, we are trying to create the effect of metal and clever embossing is our key here. Don’t be afraid to slightly overdo this effect, because at worse, it will look like rough metal and not smoothly polished like ours.
Use one of the default curves that come pre-installed in Photoshop CS

Custom shape for the contour is what makes this text effect to be unique and interesting. This is the shape I have made. All you need to do is copy these anchors and curves, after double clicking your “contour” shame small window.

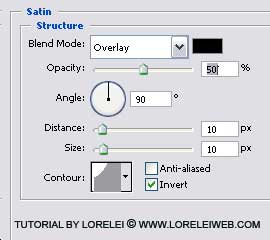
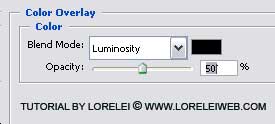
Don’t forget to reduce the overlay of the color to 50%, as we don’t want the text to be black.
After clicking “OK”, duplicate the layer. Take the upper layer and drag it down.
Go to Edit >> Transform >> Flip Vertical. Adjust your image so that the upper layers will be exactly above the layer your flipped, but with about 2-3 pixels space between them.
Set the Opacity of the duplicated layer to 28%.

As we want the shine (reflection) to be more delicate, we will only leave the upper part of it.
Add Layer Mask.
Select the Gradient Tool – From Black to White, and drag it from the bottom of the image until the beginning of the first layer. This will distort a bit the Layer settings, but this is our intention.
That’s it, here is the result!


