A great portrait has the tendency to captivate and amaze the viewer. Photos, especially portraits, project emotions and the art to taking a quality portrait photo is not easily mastered.  The following guide will allow you the ability to take quality portraits without the need of being a professional and you will be able to do it without spending a lot of time.
What’s a portrait?
A portrait is a painting, photograph, sculpture, or other artistic representation of a person, in which the face and its expression is predominant. The intent is to display the likeness, personality, and even the mood of the person. For this reason, in photography a portrait is generally not a snapshot, but a composed image of a person in a still position. A portrait often shows a person looking directly at the painter or photographer, in order to most successfully engage the subject with the viewer.
Source Wikipedia.org
Step 1: The Shooting Session

For a good quality portrait follow these steps:
A. Choose the appropriate backdrop:
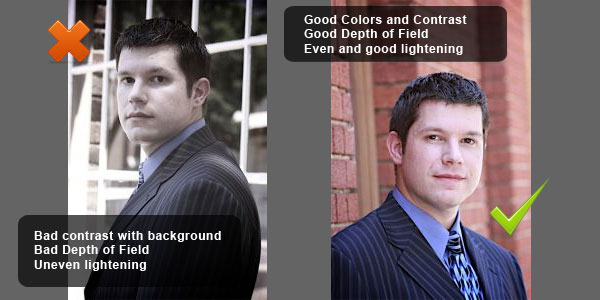
In a portrait you want all attention pointing to the face of the subject. Choosing the proper backdrop can allow the focus to be set on the face. Avoid objects in the background or a busy background, choosing a background is an important step.
B. Don’t allow the background to stand out:
Going with a neutral color is the right choice and blurring it slightly will allow the subject to stand out even further. This is done by using a shallow depth to take the photo. You can do this by shooting the subject up close with a wider aperture setting on your camera or by the use of a zoom lens. If you do not know how to do this, it can be done later using you favorite photo editing software.
C. Keep the focus on the subjects eyes:
Keep the eyes at the center of the portrait and decide what type of mood you want the viewer to feel, you can use a semi profiled picture or a straight on pose, that is up to you and the mood you want your viewer to feel, the simple addition of a smirk or grin can accomplish this very well. The subject’s features if changed in the slightest can allow you to capture any given effect that you as the photographer wish to capture. For example, you can turn a woman into a monster, by touching nothing but the eyes!
D. Keep the lighting natural:
You will want to do this if at all possible to keep the skins natural warmth and color. A good way to shoot a portrait would be to do it outdoors with the sun at the subject profile. Too much sun in the background of the photo will result in shading and distortion of the features as well as the colors of the face. If you are shooting your photo indoors, be sure to use an indirect form of lighting this will brighten the room without the effects of flushing the face of its natural colors. This can be done by placing lighting around the subject without actually aiming directly on the subject because the result can be the same as an over lit outdoor photo, creating a flushed out look in the subject and losing the vibrancy of natural colors.
E. Practice makes perfect:
This is done by simply taking several photos, in the digital camera age there is no added cost to take extra photos, this way you can choose the photo that has come out best for you. This is no time to be shy, the professionals do it and you can too just simply pose your subject in different poses, with different lighting and practice with all of your colors. Experiment with lighting, background colors that are darker or lighter and depth and keep on shooting. Shooting too many photos is better than not having enough when you’re trying to find the one you like most, it is easier to find the perfect picture among 500 than it is to find in 5.

Step 2: Portrait exposure Values
Exposure is defined as how much light actually gets to the cameras sensor. The exposure Value, otherwise known as EV is representative of the camera settings, this goes along with the shutter speed. The meaning of the number will be explained along with exposure compensation.
Two factors in Exposure:
How much light is getting to the camera sensor and the length of time the sensor is exposed. The length of time it is exposed depends on the shutter speed; the determination of how much light gets through depends on the aperture value. The EV represents how much light can reach the sensor, or in a sense how exposed it allows the sensor to be. The EV is dependent of how well the scene is lit. An example of this is the shutter speed and the aperture value allows the same amount of exposure in the dark or in the sunlight.
example of full artificial lighting
Each EV number is representative of aperture and shutter settings that ultimately have the same amount of exposure. Even though the EV number is the same for all aperture value combination and the shutter speed, the result of each photo can be different. The aperture will control the field of depth and the shutter speed will control the amount of motion that is captured.

Shooting outdoors and in motion, against the sunlight direction, hence the face is not lit properly due to incorrect exposure settings.
When the aperture setting to f-number is 1.0 and speed of the shutter is 1 second, the EV setting is 0.0. Exposure values of different settings are all relative to the EV number. Each EV setting then -1 or +1 is representative of the exposure (light that hits the sensor) being doubled or cut in half. This scenario is not likely and you will probably not find yourself having to set absolute EV values. As a matter of fact on most cameras you can not set the EV level. When you will set EVs is when sting the exposure compensation. This means you can set the exposure compensation to higher or lower than the automatic detection. This allows you to fix the problems relating to under and overexposure.
Usually the exposure compensation value is +/-5EV. And when setting the exposure compensation you will add or take away from that setting. A simple example of this would be a setting of +2EV that will make a picture brighter or overexposed while a setting of -2EV will create a photo that is dark or underexposed. On a sunny day therefore you could change the setting to a -0.5 or -1 and that will allow your colors to be more vibrant.
You can also set the EV with auto bracketing that will allow the camera to change the exposure with each photo of a series. You can also set the EV between photos.
Step 3: Fixing and Adding the Final Touches with Photoshop
Do you want to add some extra touches to make your photo stand out and look professional? Are you an amateur that wants to look like a pro? Are you tired of all of your photos coming out as if the children were the ones taking them? Then you need to use Adobe Photoshop.
You are not alone because many professionals now use Photoshop to touch up their photos too. Just remember not everyone takes a professional looking photo every time some of the best photographers have had to perform a touch up once in a while. Poor exposure, red eye and fingers over the lens are great examples of some of the errors that everyone makes; even the most trained of the professional photographer has needed some help with editing.
Professionals have easily found the way to fix these problems using Adobe Photoshop. Some professionals even edit the photos of models using Adobe Photoshop. Most photos you see in advertisements are in some way enhanced or cleaned up by the use of Adobe Photoshop. They give clearer skin and no flaws; you can reduce the look of slight wrinkles to make the skin of the face look completely flawless. If a picture is taken and later it is discovered that a bad acne problem just looses the luster of the picture, this can be easily edited out there are ways to get rid of the redness and the actual pimple itself with the easy click of the mouse. Using Adobe Photoshop can even allow you to edit away extra pounds or even enhance an area that could use a little extra.
Here are some things you can do to make your photos look a pro took them:
You can easily get rid of red eye. Sometimes red eye just happens, even with the use of a SLR digital camera that has red eye reduction built in. With Adobe Photoshop you can remove red eye from any subject, even the family pet so there are no more worries of seeing your family and pets come out looking like some type of possessed demon, we all have those old family photos where we look like extras in the latest horror movies and the use of the red eye remover will take this problem away permanently.
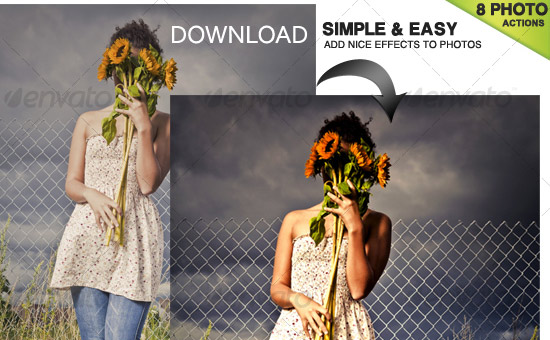
Make your colors stand out. Adobe Photoshop can not only clean up images, it can enhance the appearance of colors. The color enhancement tools can allow you to fix contrast and brightness and turn an underexposed photo into a work of art. This tool is used to manually adjust colors to give your image the look of perfection.
Not only can you fix colors, you can get rid of any unwanted image in the photo that you did not notice while you were taking it. If you see a trash barrel in the background, you can easily remove that trash can with Adobe Photoshop. Even if there are people in the photo that you do not want there, you can easily remove them with this software.
These ideas are just a couple of the many features you will find in the Adobe Photoshop software. Even an amateur will look like a professional when using this tool. Adobe Photoshop is a great addition for anyone that wants to have photos that look professionally done.
You can receive this free report so you can discover the unique video series giving complete step-by-step instructions. This will allow you to become familiar with Adobe Photoshop and have you running it like a pro in no time.
Step 4: Portrait Printing – Understand what PPI and DPI is
Most people know what DPI is, but it is usually used wrong in context to explain the number of pixels in a particular photo, the dots per inch in a printed photo or the number of dots per inch that a printer can make. We will explain the PPI and DPI and what the difference is.
The PPI is pixels per inch. That means in each photo, the number of pixels that are in each inch of the particular photo. This is also known as the megapixels in a cameras sensor, you can multiply this by the size of the photo to know the PPI it may sound difficult at first but just follow the following step-by-step. If the PPI is not your main concern this is not an area you need to focus on but if it is important go ahead and use the following steps.
All you need to do is multiple the width of the photo by the length of the photo to come up with the square inch area of a particular photo. Now all you need to do is divide the number of square inches by the megapixel amount of the camera, the total will be the pixels per square inch. The following graph shows the PPI for different sizes of a 5 megapixel camera.
- Page 4*6 – 456 PPI
- Page 5*7 – 377 PPI
- Page 8*10 – 250 PPI
- Page 11X14 – 180 PPI
- Page 16*20 – 125 PPI
- Page 20*30 – 91 PPI
The DPI means Dots per inch. The physical characteristics of the printer are described by DPI. This tells you how many dots are printed by a particular printer. Each dot is printed onto the paper at a certain size and the DPI tells you how many dots are used on any particular photo. A cheaper printer will have a lower DPI than a higher quality printer. The DPI is easily explained as the number of dots that are in a square inch of printed paper. If a printer tells you the DPI is 120 that mean that there are 1200 dots in every square inch of print. When you buy a printer you will want one that can print the same number of DPI as there are PPI in a photo. If your DPI is lower than that of the PPI that will result in a photo of less quality and if the numbers are reversed, there will have to is more DPI used to take up the space of the PPI. The DPI has actually nothing to do with the size of the paper; it is a fixed number that any particular printer is capable of.
 Hope this will help you to shoot, retouch and print your Portraits.Remember that it’s a hard task, not everyone is capabale of and it takes a lot of practice until you achieve good results.
Please also see our HDR Photoshop Actions toolkit for fixing your colors and exposure instantly.


some great tips there, thanks a lot to the authors.
love the new loreleiwebdesign.com site btw 😀
Great article, I love the way you write!
Love the Tips you are giving here, especially the ones about printing, never knew it’s so important.
Great tips. Your theme looks amazing.
Good
Thank you
Awesome and Informative tips… thanks
Cool 😀 hope to learn alot from you guys.. and good luck.. this very informative ….
A W E S O M E !!!! Just what i needed
I think it was a typo: “The aperture will control the field of depth”. Isn’t it “depth of field”?
http://en.wikipedia.org/wiki/Depth_of_field
Nothing like stealing other peoples work and getting it wrong http://ezinearticles.com/?What-is-PPI-%96-Pixels-Per-Inch?&id=252523
Good article. Most of the issues are well covered.
One point though!, it’s “lighting” not “lightening”, just thought i should point it out.
Keep up the good work!
This is amazing and so easy! Thank you for sharing!