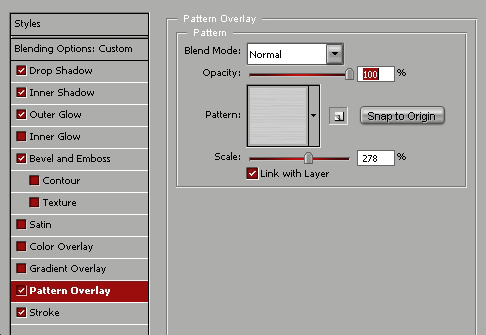
not to soften the emboss, which you may want to do. Other than that, set the direction of the emboss to “Up” and the Size to 8 px. In the shading settings, use a 120 degree angle (just like in the inner and outer shadow), Global light, and Altitude of 30 degree. Gloss contour — “Linear”; Highlight mode: “Screen” with white colour and 75% opacity; Shadow mode: “Multiply”, black and also 75%. If the box near the “Anti-aliased is checked — uncheck it. Leaving it checked will smooth the gloss contour, which we don’t really want here.

5. The pattern we used is called “Brush metal” and in included in the default patterns of PhotoShop CS2. However, you need to “load” these patterns first.
In order to load the existing default patterns, click “Layer”, “New Fill Layer” and then “Pattern..”. Skip the name and mode (you can always rename the new layer’s fill and change the mode), and click “OK”. Click the little arrow that points down near the preview of the pattern (small 50*50 px box) and then, on the side of the pattern’s submenu click the small arrow in the circle that points to the right. In the new menu choose “Load”. Choose the group of patterns you wish to load, and click “Load”. Depending on the file size, in a few seconds, the new patterns will show up in the small preview menu.
If you don’t have the brushed metal, you can download it from Adobe’s website, and if you can’t download or not succeeding to install the pastern, don’t worry, you can choose any of the other patterns such as leaves, old paper or marble and others.

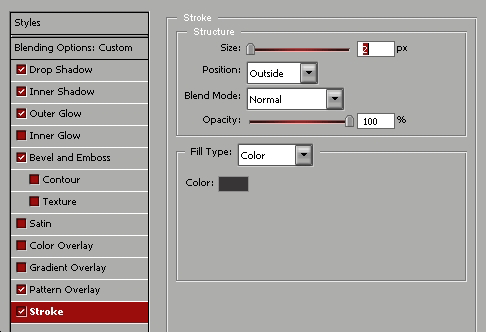
6. The last touch up is really up to you. I have chosen to add a 2 px black contour to this style, you may want to choose 3 or 4 px, or not to include the stroke effect at all. From personal experience I must say though, that 1 pixel contour tend to create a “pixelated edge” (jigsaw-like edge). 1 px contour mostly looks good only on very small fonts and shapes, or on simple forms, without many curves. For instance, the Very first image (Lorelei text on black background), is very curvy, and therefore trying to add a 1 px stroke of any colour gave it a pixelated edge.
If you liked this style, you can, after you have finished configuring all the settings, save this style, so that next time you decide to use it, you wouldn’t need to go though this complicated process again.
Saving the style is easy: Before closing the Layer Style window, click on “New Style” (just below the ‘cancel’ button), and give this style a name. Don’t forget the check the box for “include layer effects”(!), and click “OK”. And where your style is now? In the colours / styles window (to open it click “Windows” and then “Styles”), open the “styles” tab… scroll down, your newest settings will be the last in the list, and from now will be accessible in one click.

Pages: 1 2


