
Remember the copy of the text layer you made invisible a few minutes ago? Time to get it back to the surface. Make it visible, Rasterize the layer (right click on the layer’s panel >> Rasterize layer), and press CTRL + T to transform the layer, then enlarge it.

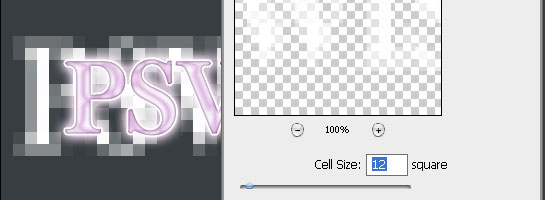
Place it under the pinkish text layer, and go to Filter >> Pixelate >> Mosaic..
Apply the following pixelated blur effect using 12 square.
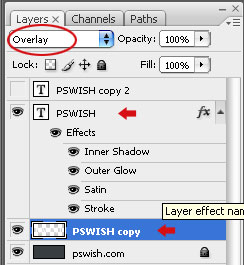 Now, to the most important part. Set BOTH layers’ opacity settings to Overlay. This means the pixelated background and the pinkish text will both have Overlay as their Blending Options. This could be done directly in the Layers Panel on the side select the layer you want and set it to “Overlay”. That’s all, your text is ready and you can see the final result below. I would say that this text effect is both candy-sweet and techno-cyber-cold, while the combination turns to be original. It can be great for web design websites and portfolios.
Usage Restrictions:
Feel free to use this tutorial for any commercial or non commercial project, as long as you don’t directly resell this tutorial, or the exact images used we used here for demonstration.

Pages: 1 2







Thanks For the tutorial, i think that this site is great for effective fonts thanks again!
nice quickie effect..me likes!!
I read a few topics. I respect your work and added blog to favorites.
I have tried this twice, and I still dont get the blocks in the text or the colour in the text for that matter? All I get is the faded blocks on the outside of the text.
sev, you should place the blocks behind the text!
wonderful! all genius is so simple =)
respect from russian photoshop user, author =)
Nice tuts, thanks for sharing.
maravilha briagadooo ..ameii