Dark Fantasy Art tutorial called “Sleeping Sun” by Lorelei (me!) was originally posted on www.loreleiweb.com The tutorial remains a copyright property of Lorelei © 2009, however, now it has moved to PSwish.com due to technical / server reasons. We invite all our LoreleiWeb community to subscribe to our feed and make sure you don’t miss any tutorial written by your favorite authors.
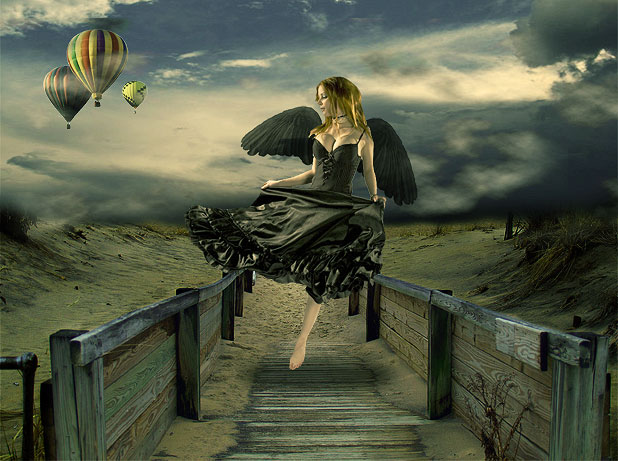
Despite been classed as fantasy art, this is mere photo manipulation – make a fairy and your own mystic scenery; creating a landscape from scrap is now possible! I was inspired by the huge success of my previous fantasy art tut, which I posted in this forum last week… I got quite a few emails thanking me for it and many PS blogs featured it, so I decided to give in to repeated requests from millions of loving fans and do one more fantasy/scenery tut…
This is basically a mix of whats we call “fantasy art” and “dark/ gothic art”
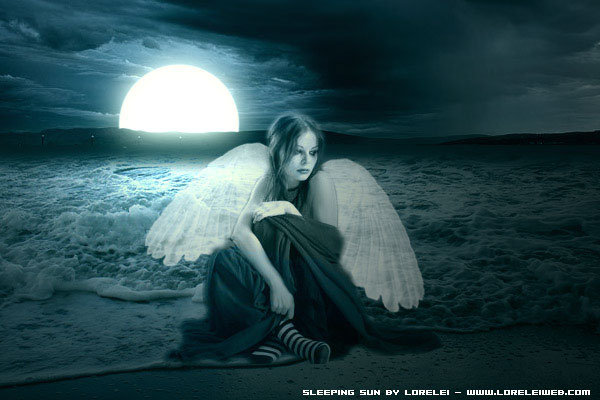
I want to mention in advance that this tutorial is mostly for more experienced users, here we will need to use a lot of “handwork” and common sense; you will be working with your own images and would need to adjust to the “needs” of your landscape.
So, let’s get started… make a new canvas – 600* 400.
Fill your background layer with any dark color, we chose to do it with blue, but you can use black as well.
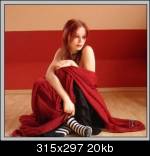
Take a picture of a girl… we used this one, from Liam Stock, free photo resource.. ( http://www.deviantart.com/deviation/39058232/ <– Full resolution image)
This would depend on the image you use, but try to crop the figure accurately and remove the background.
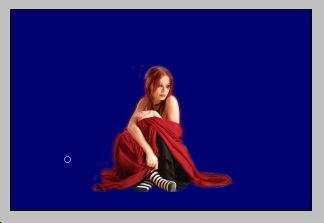
Select the cropped girl from your canvas, and paste it unto the blue fantasy canvas we will create.
Place her in the middle, not to close to the edge, as she will be our leitmotif.
Next step, you will need different photos in order to combine a landscape.
First off, a photo of a shore. We took a pic offered free by ~gladly.
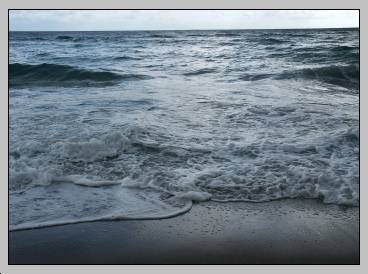
Press ctrl + a to select the entire waterscape, Ctrl + c to copy it, and then, when you go to the fantasy canvas – press Ctrl + V to paste it.
Be sure to place the waterscape layer UNDER the layer with the girl. This is important, we placed the girl first in order to be able to see what proportion are we creating with the landscape, however, remember, that she shall always be the top later.
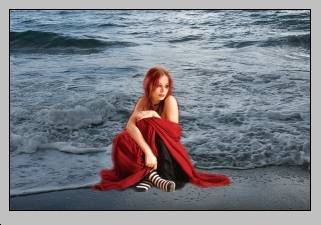
Using the Eraser tool, with a soft edge, 40 or 50 px size, draw a line (horizon), which will be around the level of the main figure’s eyes. This is ideally, but if you use a taller person, or not a sitting figure, of course, you can draw the horizon wherever you wish.
In order to make sure that your line is straight, press the Shift button while pressing the mouth, this way, even if your hand will hove, the line will remain straight.

Now we need the sky. Don’t look for any spy picture, because we mostly need a horizon line (with mountains, or just a stroke of land) rather than mere clouds.
The hue of the picture is not important, all you need is a cloudy interface with a bit of land to symbolize the horizon.
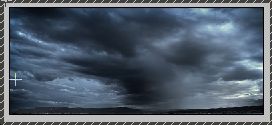
Paste your clouds photo unto the fantasy canvas, UNDER the waterscape layer.
The horizon line of the water has to be a little darker, so u can go back to the background later (blue canvas) and brush it with black or a darker blue hue.
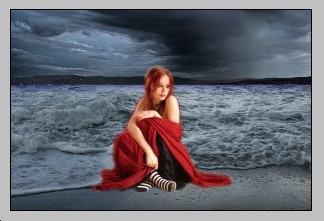
Create a new layer.
Select a Round Brush with a sharp edge (do not use a soft edge here!) and Make a stamp near the figure, as shown in the picture below.
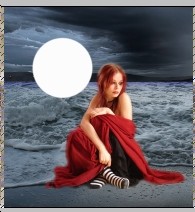
Set the opacity of the layer to “soft”, to make it semi-transparent. Using the eraser tool with a sharp edge, remove all the remains, so that it will look as if this sun (or moon, if u wish) will create the illusion of setting behind the hills/landline of the horizon.
See the illustration to understand it better, and once you have finished erasing, don’t forget to set the blending options back to normal

Go to Layer >>Layer Styles >> Blending options, and apply these settings for the outer glow effect. Don’t skip this step, this is necessary to make an effect of shine and glow.
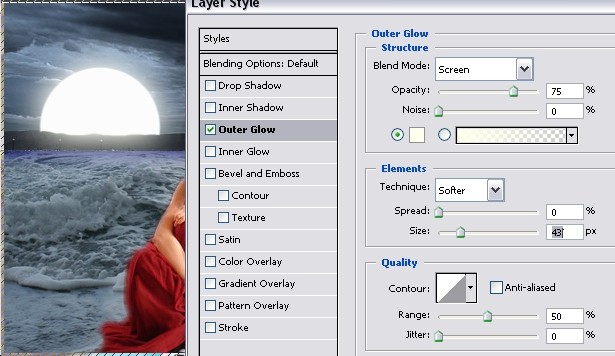
Select the waterscape layer.
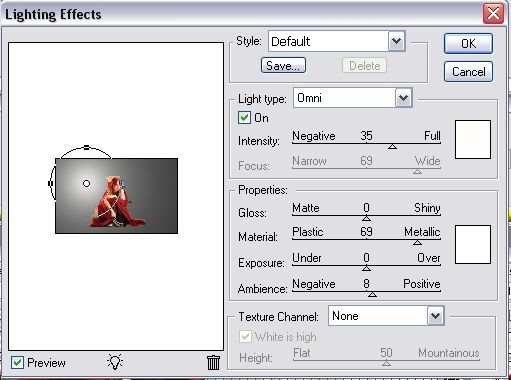
Go to Filter >> Renders >> Lightening Effect.
Make a light spot, exactly on the place where the sun is… this will lit the water in front of the setting sun.
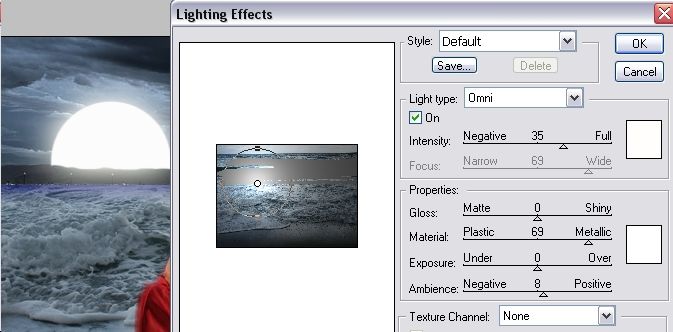
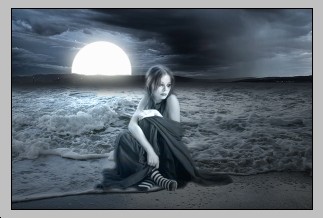
This is what we got so far, beautiful water with a local lighting.
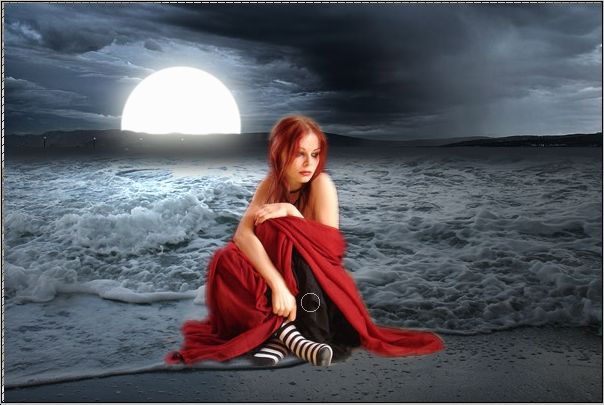
Select the layer with the cropped girl (main figure) and apply the same spot lightening effect.
Its important to use same location for the spot, as we only have one sun here!
Set the blending options of the layer with the girl to “Luminosity”, in order to give her the same hue as the layers underneath her.
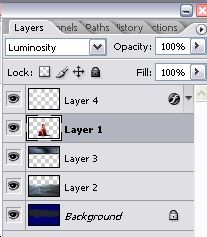
After the recent few steps, you canvas should look like this… If anything looks different – don’t worry, in the end you might get even a better result than the example in this tut.
Now, we are going to need wings to add to our girl and turn her into a fallen fairy.
I’d recommend using Photoshop brushes in the shape of wings, and not to crop wings from other photos, as we need high-quality transparent wings.
For this very tutorial, I used wings brushes downloaded free from Deviant art – http://www.deviantart.com/deviation/11925788/
Once you have installed the brushes, make a new layer (don’t forget) which will be placed BELOW the girl, and ABOVE the waterscape layer and the sky.
Use a size that will suit the size of your figure and canvas. We used wing brushes 185px, but this is individual.
Pages: 1 2



Very nice, good job. I’m going to try this when I have time.
thanks, i’ll try this later
more fantasy art tutorials pls
I agree providence. Keep em coming
wow thank you very much, i love these kind of tutorials, stuff like this is what makes people (think) about there designs and do there own creative work, thank you again
this was very nice.
i gave it a tried, but
my pictures didn’t
turn out as nice.
love the tut though
@mystika_d
Same here, but I didn’t really find any good pictures to work with.
I’ll get back to this later when I’ve found some pictures.
Try this gallery, the famous Liam Stock:
http://liam-stock.deviantart.com/gallery/
i ended up with this
it looks different im not sure what i did wrong
http://i3.photobucket.com/albums/y52/providence4ver/photoshop/fallen_angel.jpg
I don’t know if someone answered your question, but I think you need to remember to “feather” your selection. this keeps it from having a cut-out look. you do this by using: Select>Modify>Feather (usually only 1 or 2 pixels settings)
this will make it blend into the background better. I hope this helps.
Heres my go at it…
http://i29.photobucket.com/albums/c271/ThaGrimiestOne/WheretheMoonRises.png
wow! I love that picture
and the added shadow
^^Thank you very much to both of you
Ya i dont like “copying” tutorials exactly, i just pretty much read it over a few times, then close the page…and try to do my own design of it and see what happens… and thats what i came up with…
P.S. Thank you for the compliment to about the shadow, i thought it brought out the “realness” of the picture alot better
considering that there’s only 2 of us who posted our work, you’re then referring to me. Well moderator, if you are moderating you’ll see that I copy the work first to see if I can do it, then I post my own work later. If you check the previous Fantasy Art tutorial. Considering I did this at 2am, I didnt have time to do my own. so yeah.
providence, if you read what he said , he said its the most original “So far”, which means there will probably be alot more designs and probably even better ones shown…so ya.. i wouldnt take offense to it, he didnt mean nethign bad buy it towards you or neone else…
Good luck with the next project you plan on doing
Providence,
Let me apologize on moderators behalf, i dont think it was ment in that way, only the words sometimes look kinda harsh….
It was for sure not a reference to your work, which looks good also…and I think Lorelei will agree with me on that.
Yeah it’s v.good, but isn’t the shadow at the wrong side? The light is coming from the distance and the shadow is in the opposite side to where it should be? V.creative design just wondered if it’s only me that thinks that
hmm, well i guess it could depend on the way you look at it…the sun could be really in straight but the angle of the picture it showing it from the side….or…and sun could be higher or lower also, making the shadow angle in many different ways though, lol…
i dk, i personally thought it looked cool right there..
thank you for the interest about it though, but ya, definitely just depends on the way you look at it…as you see, i never go buy what the eyes can see…
i like to “manipualte it” even more…so that sun could be anywhere in the pic, but looking at in a different angle would make the shadow also seem in a different place..
sry if i confused u, i just think differently than most people lol..
Lol i wasn’t slating it as it’s better than what i can do i just thought i’d got the physics wrong, i’m attempting one now but can’t find good enough sources
Since I enjoyed the other tutorial so much, I had to try this one out too.
Not quite to the same standard as the tut but I’m pleased with the end result.
Good evening, people. I just registered because I’m in theprocess of self-learning some Photoshop and I liked this page very much. I hope to learn a bit hehe.
So, first try at tut! the result is here http://i9.photobucket.com/albums/a10…Fairy-Moon.jpg
(I didnt want to post the full sized one here in case it was too heavy, instead I linked to it)
So, see you all around.
I loved this tut this was the result i got i actually like it alot
http://img457.imageshack.us/img457/5238/fallenangelar4.jpg
Wow….Nighthawk….a really stunning result!!!
And welcome here…hehe….hope to see more of your works!!
Great result NightHawk, very mysterious. I love the colors scheme you came up with! 10/10
Great work nighthawk…its a real good pic…here is mine
http://img76.imageshack.us/img76/5223/fairywy7.jpg
MadMike from constanta (your sure it isnt constantza??…. )
Great outcome…well i do have a comment on the right wing.
I would place the girl a bit more to the left so that the wing is shown a bit better,but besides that great work!!!
ps..if constantza…rumania…black sea…where you have to pay to get on the beach (at least that was 10 years ago)…
thanks guys i tryed hehe and this forum is really cool im glad i found it
I was just wondering;
Where might I find the picture of the sky/horizon? I can’t seem to find one that will suffice anywhere.
@The Kangarooster
Try…
http://www.morguefile.com
http://www.deviantart.com
http://www.stockvault.net
they have tons of great pics, for personal use u can take anything…
Kangarooster,
Uploaded an image for you,but dont know if you find it suitable…
Anyway its made by me and feel free to use it if you want..
http://img471.imageshack.us/img471/7604/skydv8.jpg
or you could might as well go to google>images and search…”sky” ocean horizont” ”clouds” ”sea”….stuff like that
Finished copy
http://img233.imageshack.us/img233/7103/girlfixfz9.png
Kangarooster…..
Looks very nice, and very sharp too….keep up the good work, hope to see more of your works!!
Hm where all of you geting girls foto?
I only can make them self, canot find any photo storage…
Also i used diferent levels, and diferent methids, And i realy like this sun, so ty. Realy useful tut.
Gvinpins,
Unfortunatly we can not see your work, try uploading them here http://www.imageshack.us.
In case we can be of any assistance feel free to ask.
That’s a really cool tut. I love the lighting effects, they’re haunting, and just from what was a simple white circle. Nice!
Hi everyone i am just starting out with Photoshop and thought i would try out this TUT!
Heres my attempt!
http://i21.photobucket.com/albums/b259/DANSDEALS05/Angelbydusk.jpg
Props to nighthawk and Gvinpins, your results are FANTASTIC….. everyone elses I also saw are really great also…
But im my humble opinion, gvinpins has the most creativity out of all these, i like it alot,
Hi!
Here’s what I came up with, it’s not exactly the same because I wasn’t happy with the way it turned out. Basically the background landscape image had too many colours and it looked funny when I set the girl’s layer to luminosity.
I think it turned out ok.
Please any suggestions would be welcome. I’m very open to positive criticism. ^_^
http://i57.photobucket.com/albums/g219/blue_mnm/textless.jpg
Another great tutorial Lorelei I must say you have a talent for capturing ideas, I will try this one also see if my daughter will like herself like this
Hi! I’m the newest member as of now This is what I came up with.. (that’s actually me, hehe) I really enjoyed this tutorial and I like what everyone came up with. I wasn’t able to download the brush so I just cropped wings from the internet. I hope it looks good!
http://img182.imageshack.us/img182/2172/fallenangelrc5.jpg
i have a question:
how do you make the wings not transparent? I mean it looks good see through, but i want to make it look more solid…
pls pls pls help me. how do i erase the background of a cropped pic? i thought i did exactly what the tutorial says. crop the picture (i’m using different pic) erase the background. but it would’t erase anything. i tried to paste the cropped picture unto the new canvas created, but the erased area is white. it is now 11:35 here. and i’m just about blind. i’m going to bed, hopefully tomorrow i get a response from any good samaritan. i would really appreciate any help. i was successful on the other tutorial.
Mines not so good as pics of all of u but i only read tut and then close it….thats my artistic variation about fantasy tut
http://img291.imageshack.us/my.php?image=ooxl6.jpg
My mistakes i made:
-croped poorly
-didnt give wings…i just dont like angels
-took bad pictures…
-I made enemy in my girlfriend person
Im using PS from 2 hours.
Edit/Delete Message
can someone please show me how to add the wings??? I just Downloaded the brush, but i do not know how to add it to the picture..
thanks!!!
This was so great tut, that I had to register!
My try:
http://i143.photobucket.com/albums/r146/DemoniWaari/Wingedwoman.jpg
I played with the levels so it aint so… blue?
DemoniWaari,
I really like your outcome….only one little point of critic: Looks like you have done something or maybe forget something with the head of the girl….dunno, in my eyes it looks different then the rest of the image…..
But besides that little point (my personal opinion)…good job!!….hope you will share more with us!!
Hmm, maybe I did Though I dont remember doing anything special :/
DemoniWaari, it’s very original, i like the idea of girl with the wings holding a sword and the sun behind her… my only comment is that the image is bright. i mean real bright… aint it? maybe i have a too bright screen though..
I loved this tutorial and here is my result,
http://i41.photobucket.com/albums/e2…/fairysea2.jpg
My first try at a tut here, I liked it very much…
this tutorial was great! heres my attempt at creating something similiar, using a picture of myself though. i think it came out alright, i might be able to blend myself in a little better but thats another time., (also the shoreline could be better but this was the best picture i could find, otherwise the waters horizon would be further off)
heres a lighter and darker version
http://i18.photobucket.com/albums/b105/Mynorities/collagePREtintchanSM.jpg
One of Charly’s angels…
http://img134.imageshack.us/img134/5255/fantasydiazqq5.jpg
I have the competition is Cameron Diaz.
To have if you like this.
Within the Dark there is a light that shines.
Looks great, Pepekun. The colours in the second picture are milder, like it more. Well done and keep it up!
Hmm, dunno if the code’ll work…Well, fifth pic in photoshop. Turned out ok. I added a glow to the wings because they seemed too transparent.
http://img132.imageshack.us/my.php?image=skyishcoolor5.jpg
Great result (to me) Conquest…keep them coming!!!
Great tut as usual Lorelei
Wow mine does not even begin to look half as good as everyone else’s. You all are so very talented. Well here is my stab at it. My question is that everytime I try to resize a photo sometimes the pixels look hazy, how can I prevent this. Do you see how it happened to the water portion.
http://img414.imageshack.us/img414/7866/therowboattealcopypm6.jpg
First of all Lorelei u’r great! Saw this tutorial on a homepage, and decided to join this world.
Im a newb I made one of thus images too, but the part with the sun went wrong in somehow!
Hi Devilsh, thanks for your complement!! I absolutely love your image, it has this mysterious fog effect that no one made so far! i wouldnt say that the sun is wrong, apart from been not lit… when u applied the light spot, was it exactly on the sun, or has it gone on the waves, near the girl? (because it looks like it did). seems to me the light spot is on her left wing, not the sun…
What are you think about this:
http://images1.fotosik.pl/302/be1aea2aa0172106med.jpg
I had a go too, lol. I enjoyed doing this one. Going to fid somewhere to use it.
The symbol in the moon is a Valknut/valknot the symbol of the slain who gave their lives to Odin in Norse mythology. The girl holds a Viking sword, and with her wings resembles a Valkyrie.
Valkyries swooped down on the battle field and took the Einherjar, or fallen warriors, (only some, the bravest, were chosen) and carried them off to Valhalla, the Norse heaven.
Any comments are greatly appreciated.
Duplicate the layer with the girl and put it under the original girl, now create a motion blur with settings of you choice in the girls center(!)
At last reduce the occapacity (right this way? ^^) of the new layer.
Lurnas
Edit/Delete Message
Looks great…really! I especially like the girl on the background…fits really good…
Well, here is my contribution..
It’s my first “artwork” with Photoshop!
http://i126.photobucket.com/albums/p99/mrSteelman/GirlOnBeach2.jpg
I found this tutorial and really liked it so i tried too. This is what i got, lol.
It was my first try..maybe next time i’ll do it better, hehe.
Feel free to comment and give me sugestions. (i had troubles with the moon ;-( ).
http://i78.photobucket.com/albums/j120/Bodylove27/fantasy.jpg
Thanks for this tutorial. I learnd alot from it.
Hi, thanks for this amazing tut! This is the first time i have really tried using photoshop and although i need alot of practice, your tut made it so much easier!
Anyway..here’s my go…….
http://i16.photobucket.com/albums/b18/serasixx/prayer.jpg
I really enjoyed this tut lorelei, nice work. And great job everyone on your results. When I saw this the other day I decided to use a few aspects of it to create a football signature I was working on.
Oh my god, this is a very great tutorial!! It was very useful for me! Thanks…
I was kind of searching for something like this.
I was surfing on the net searching for inspiration and saw this lovely tut
Thank you very much
http://img180.imageshack.us/img180/4787/fantasyartjormaqj3.jpg
thank you mster
i made this last week, im a newB so i followed all the steps and copy the images except for the clouds and the wings! thats all the wings i have! i really enjoyed doing this and your tutorials are so easy to follow! thnks again!
http://pic20.picturetrail.com/VOL135…/226883520.jpg
This was a vary easly tutorial! I will show my pic as soon as I get it posted onto photobucket! Thanks Lorelie!
Here it is! Hope you like it!
http://i83.photobucket.com/albums/j3…nwithwater.png
nice one :O
heres my outcome. I didnt realy read your tut lol
http://i90.photobucket.com/albums/k278/dilfill_photos/Falling-moon.jpg
Here’s my try at it… Its my first try at something big in photoshop, never actually learnt photoshop, only fiddled with the filters and tried to make display pictures with em, so here goes…
Damn. Its too large. It can be viewed at 147.photobucket.com/albums/f163/gswrulez/FantasyWork.jpg , though. Comments and tips and advice and stuff will be appreciated. Criticisms too, preferably constructive.
http://i33.photobucket.com/albums/d86/Darksong2006/OceanAngel.jpg
My own go at it. Yay.
REALLY LIKE UR WORK lorelei..
hey here i tried 2 work wid the same image but used a diff background…, in this the mountain , the sea ,the shore,& the small house r diff images merged.. sowy guyz the image wudnt b tht gud cause had 2 sav it wid low resolution 2 upload it…
WUD LIKE 2 HAV UR SUGGESTIONS….WID WHT I HAV DONE
This would have to be the best tutorial that i have found so far (i ve turened both my girls into dark fairies then used the vampire tut as well)one question though what settings colour levels should you use for a firey sunset as most of my photos are of this sort of nature. thanks again for a great tutorial nice to have one that does the whole picture
Cheers R@ngi
thanks for this tutorial, its awesome.
im a beginner and i found this very helpful.
i gave it ago with my dog instead!
thanks alot again
Thanks for the brush and pic links they will come in very handy Ive never tried fantasy so I thought this would be a good tut to start with. I went with different pics but the idea is still similar…….
http://i201.photobucket.com/albums/aa318/iulian_2666/angel1.jpg
I did mine a few days ago but didn’t post it yet. Here it is though I’m not sure my image looks solid enough, or something…I don’t know. It probably depends on
http://i32.photobucket.com/albums/d30/Gethsemaney/fantasyartproject.jpg
wow very great tut lorelei.. i love fantasy art.. im still working out on it… hehe…
here it is.. i used my own pic… thanks to lorelei for this wonderful tut.. its hard tho but i made it! and i love it…
http://i82.photobucket.com/albums/j279/poshonline16/me-angel.jpg
http://img2.putfile.com/main/7/19216532716.jpg
This is my try
To lazy for the fwings thou
This is one popular tutorial and I can see why! I’ll try it and post my result.
Sylvesterin, you have incredible colors in your composition, its sooo neatly done, i absolutely love it. may i ask what clouds did u use and what seashore? jeee, how did u achieve such a colours scheme?
sexyposh, glad u liked the tut and thanks for sharing ur result! i like what u did tho i think u should crop the images more carefully, on pars like hair u can always go over the edge with eraser tool with soft edge to avoid pixelated edges…
Here’s a darker version, using a black/white gradient, invert layer and three different photo filters. I love the outcome:
http://xs117.xs.to/xs117/07285/reflection4.png
This one i made, with a different cloud picture, and a different girl..
she’s actually my friend..
http://i203.photobucket.com/albums/aa106/risachynn/angeljoyce.jpg
the tut was great, i haven’t been able to see the settings clearly.. i only saw a little image and i can’t quite finish what i’ ve started without having full knowledge of the original settings. thanks!
Loved this one. Worked with my own pictures. This is how mine came out. I am still a beginner. Bear with me please.
http://i45.photobucket.com/albums/f64/badtzypr/water-angel.jpg
This is what mine came out looking like. I am new to photoshop so please be gentle with me. I hope to be awesome like you one day. Right now…you are the one pushing me to learn.
http://i45.photobucket.com/albums/f64/badtzypr/water-angel-1.jpg
I think if you have the opacity on the wings just a little bit higher I think it will be a bit better. But I love that picture! That girl is very very pretty =)
nice job
I really enjoyed this tut. Here is how mine came out. I think some of it could have been a bit lighter but over all I like it.:)
http://i25.photobucket.com/albums/c78/gijenister/beach6.jpg
this is a really cool tut. thew possibilitys of me useing actually are kinda low lol. im not much of a fairy person. but i admire the work 🙂
Wow amazingly done by lorelei… Keep up the good work…
HI GUYS, I`m all new to this, been using photoshop cs3 for 3 months and ffollowing some of your tutorials, this is my rendition, comments are very necessary for me to grow,
http://www.bebo.com/PhotoAlbumBig.jsp?MemberId=3696284367&PhotoAlbumId=6138031601&PhotoId=7235485466
and my first try at an online tutorial…
I used a pic of me taken at my Handfasting.
http://i24.photobucket.com/albums/c28/unsocialhippie/moonrise-1.jpg
I love this kind of art. Thanx so much so the tuts here, they are great.
(It looks much better as a wallpaper and not this small size though)
i dont like so much those gothic pics, but it’s nice to learn
yeah, the second one is good, but the figure wasnt cut properly, and i feel it let me down, but thanks anywhay
thanks…it is people like you who have so much talent that you are not afraid to give away the world…
I have an old adobe set about 5 years old…the whole kit. I am looking at paintshop pro, but I only have a trial…what do you suggest…should I buy a new photoshop, or would I be able to get downloads off of cnet and so forth?
thanks for this great tutorial. I will have to attempt it. I do faerie spells and I like as much faerie grafix as I can get….thanks again, and if I get into this, I will be sure to pay you first. Love your giving nature.
blessings
Plasticheedcase – please don’t discuss illegal operations like that on an open forum.
all of you are the best!!! 😀
I think I in the right place to learn photoshop 😀
is it possible to add halos or change the coloration of the clothes?
Just joined and came across this. Nice write up. 🙂
Here is my attempt. In retrospect there are a few things I would change but o well, I’ll take it for my first shot.
http://img.photobucket.com/albums/v71/VW2.0GTi/evilbeach-fullcustom-red-3.jpg
PS: What host do most people use? I have webshots and photobucket and they both pretty much kill quality and color.
So cool..but why I can’t make things work like this? the color doesn’t balance at all 🙁
thanx…. can i ask you on question where are you from… i mean where were you borne????….
becouse on a picture you have there are russian words why is that…. are you from Russia or somthing….
Hi all….well I signed up about 10 hours ago and then took my whirl at this fabulous tutorial. I had bookmarked it about a week ago but needed some practice before diving into this one. I played around for awhile and below is my final version. Thanks so much for the instructions; the tut has inspired my mind with further visions…great, I’m already a black belt in insomnia. :big: Hahaha! Wishing you all the best,
Rob del Arsante’
http://i77.photobucket.com/albums/j5…gedwtrmark.jpg
Credit to: Tut by Lorelei
*Clouds from* FreeFoto.com
*Stock model* Liam….liam-stock.deviantart.com
*Grunge frame* Tackybrush……tackybrush.deviantart.com
hollla muy chevere estos tutos para crear fantasia de la nada
gracias
Thank you for publishing this, I am very new to this type of art, and I enjoyed the challange. I am pleased with my result I used all my own pictures, now I will try again in my own style. I will look out for more of your tutorials
Thank you again
Susan
Great tutorial there but i wonder is that Sunset Landscape or a Sunset Landscap.?!
nice tutorial…and easy to follow..thanks!really liked it…tried some for my pictures and it really is great!
Another great fantasy art work thanks
Nice but not easy and might have a good idea. I am collecting likewise lessons. Have a nice day!
Very nice site!
Very good tutorial, thanks.
This is another excellent tutorial and makes use of a range of effects that are powerful but take time to master. The lighting effects tool can be used very effectively if done correctly, as in this case.
The layer tools seem to have an infinite number of uses, and the outer glow methods as illustrated here certainly show their power. Using these and combining them with other effects such as levels and shadows can create stunning results.
I would like to see more tutorials like this, may be some that concentrate on using certain tools of Photoshop. Thanks for another useful tutorial!
Nice tutorial! Thanks for that, tried to do it, bit harder then it looks though.
Im going to have a good attempt at this tonight once I have wined down. Thanks.
You may control all aspects of your website but there are numerous factors beyond site optimization and measurement that impact your revenue directly.New firms seemingly come out of oblivion.
People that would like to get good grades find a trustworthy custom writing service to order their academic essay at. The same actions I do too.
Fantastic beat ! I would like to apprentice whilst you amend your website, how can i subscribe for a blog website? The account helped me a appropriate deal. I have been a little bit acquainted of this your broadcast offered vivid transparent idea
I wish i had these types of tutorial when i started with Photoshop2 6 years back! every thing is so nicely explained!
Lot of Photoshop tutorials I have read on photo manipulation. I am really impressed with this tutorial. Dark Fantasy Art Photoshop tutorial – Fairy and Sunset Landscape. Thank you