This tutorial was originally posted on loreleiweb.com and was inspired by occultissimo.com, but it was moved to pswish.com due to technical reasons. The tutorial remains a copyright property of Lorelei (me!)
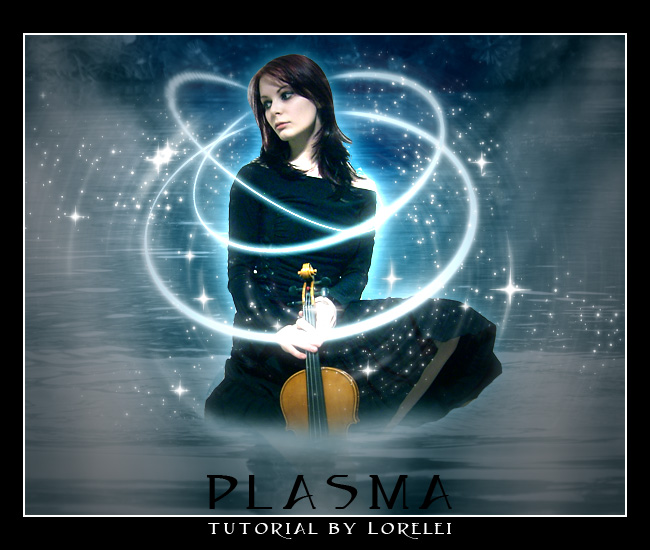
The requests for Fantasy Art tutorials are enormous; I still get emails and PMS from people asking to do more Fantasy Art tuts, so here is one more called “Plasma” (Star, not the TV!), which I hope you’d enjoy.
1. Make a new canvas. We used 600*480 px here, but the size is optional.
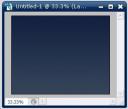
2. Select the Gradient Tool, using two shades of blue (see below), and fill your canvas so the darker color will be on top.

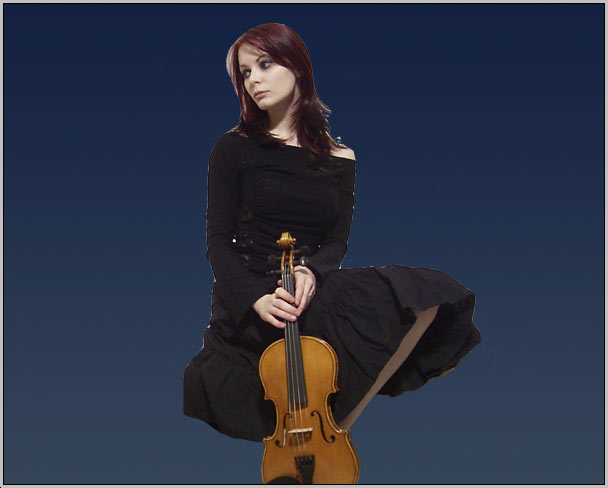
3. Take a photo of a girl. Traditionally, I have used Becca’s photo from her Deviant Art account, but you can replace her with any semi-sitting figure you choose. Crop the figure and paste it onto your canvas. If needed, resize her so that she will fit in.
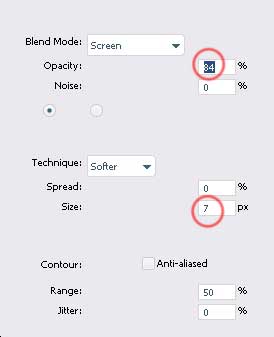
4. To get rid of the visible crappy cropping, and to give the girl more emphasis, add blueish glow to her by going to Layer>> Layer Styles >> Outer Glow and applying the following settings:
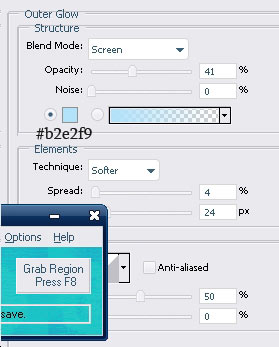
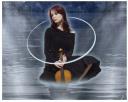
This is what you would get:
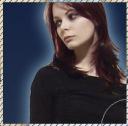
5. Make a new Layer. Make sure your primarily and secondary colours are black and white. Go to Filter >> Render >> Clouds
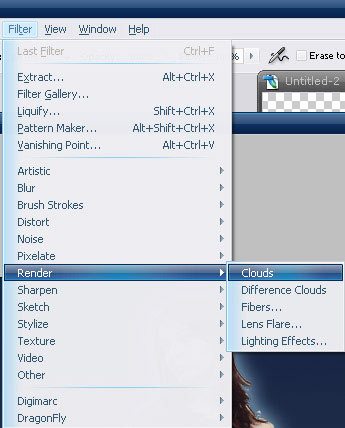
And if needed, apply the cloud effect several times to achieve the desired randomly “clouded” effect.
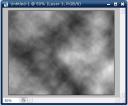
6. Reduce the opacity of the Layer to semi-visible.
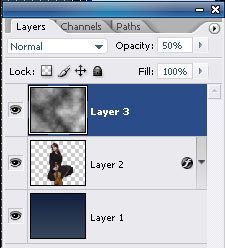
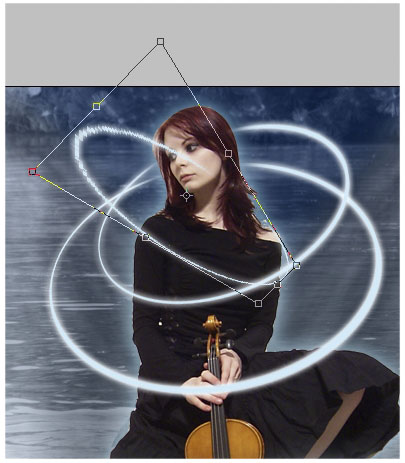
7. Press Ctrl+T for free transform, then right mouse click and “Scew.” Drag the left corner of the clouds layer, as shown on the illustration below:
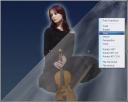
Press “Enter” when done, then Ctrl + D to deselect the Layer.
8. Duplicate the cloud layer. Select the upper Layer and Edit >> Transform >> Flip Horizontal.
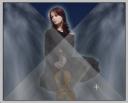
9. Select the girl’s Layer from the layers panel and drag it to the top to be your upper Layer.
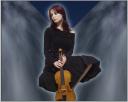
Remember to remove the parts where layers turn to be on top of one another.
10. Take a photo of a lake with water circles. We used this one from Digital Free Photo, but this is optional.
Paste the Layer into your composition so that the circles in the water will be “around” the girls or your main figure.
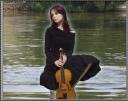
11. Using the Eraser Tool, remove the lower part of the girl’s Layer, creating the illusion that she is really sitting inside the water and the water circles are “from” her.
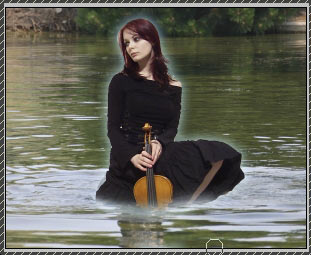
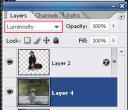
12. Set the lake’s Layer blending options to Luminosity.
13. Drag the Layers of the clouds on top of the water later and, using an eraser tool with a soft edge (100px), remove the sharp parts so that only the “steaming” clouds will remain, with no edges.

14. Now to the hard bit – creating the plasma cycles.
Please make a new layer (this is important) and place it on top of all the others.
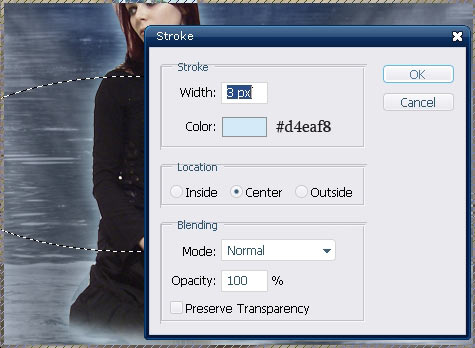
15. Using the Elliptical Marquee tool, draw an ellipse. While the ellipse on the new Layer is selected, Right-mouse-click and choose “stroke.” Apply the settings below for the stroke effect:
16. Press Ctrl + T to free transform, and then right-mouse-click >> Prospective. Try to distort the round Layer you have. It would look like the line is surrounding or flowing around the girl.

17. Using the Eraser tool with a significant soft edge, remove the “farther” part of the round, behind her head, like this:
18. While this Layer is selected, go to Layer>> Layer styles >> Outter glow and apply the following glow settings:
19. Duplicate the Layer several times, and, each time, transform the round using the prospective settings so that the circles chaotically surround the main figure’s body.
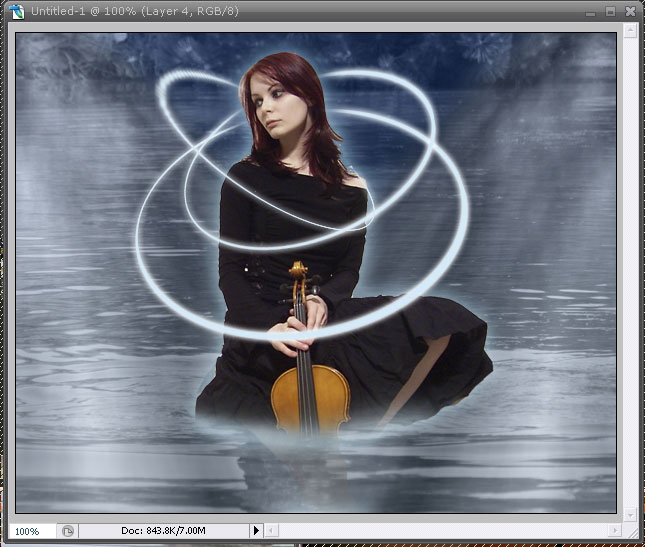
20. Remember to leave the “front” part of the circle visible and erase the “back” part. This is more or less what you should have by now:
21. Flatten the Layer.
22. Go to Image >> Adjustments >> Levels and apply the following settings to give the image an overall bluish hue:
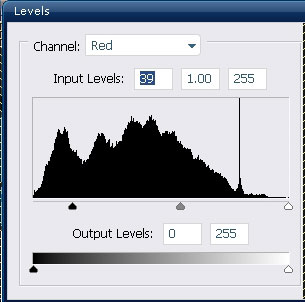
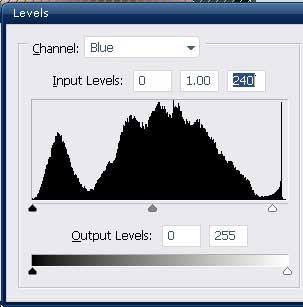
23. Duplicate the Layer.
24. While the upper Layer is selected (and your background colour in the palette is set to white), go to Filter >> Distort >> Diffuse Glow and apply these glow settings.
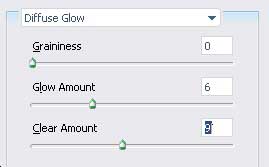
25. Reduce the opacity of the “glowing layer” to 20% (or less, depending on your image).
26. Flatten the Layer again to merge both layers into one.
27. Using some star brushes (download free on the Deviant Art resources page), apply the stars chaotically around and all over the glowing cycles.
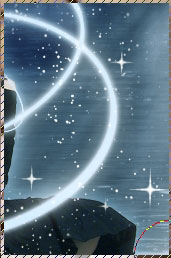
28. Select the background layer (the artwork, not the stars) and apply the spotlight effect twice to Renters >> Lightening effect.

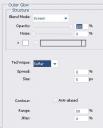
29. Return to the Stars layer, go to Layer>> Layer Styles >> Outer Glow, and add the following glow using white #ffffff color.
30. Duplicate the star’s Layer.
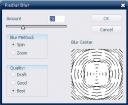
31. Go to Filter >> Blur >> Radial Blur and apply these settings.
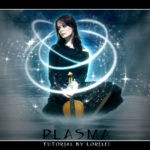
You may create this Layer’s opacity if you feel the rounded blurred effect is too strong. That’s it, your artwork is ready:

Download my poorly cropped Render:

Text Version:
Fantasy Art Photoshop Tutorial: Creating Plasma in the Lake
Overview
In this tutorial, we’ll dive into creating a stunning fantasy art scene featuring a mystical plasma orb floating above a serene lake. We’ll cover techniques such as blending modes, layer masks, and custom brush creation to achieve a magical atmosphere.
Requirements
- Adobe Photoshop (any recent version should suffice)
- Basic understanding of Photoshop’s interface and tools
- A high-resolution image of a lake or serene water body
Step 1: Preparing the Background
- Open your lake image in Photoshop. This will serve as the background for our fantasy scene.
- Adjust the image to your liking using
Image > Adjustments. Consider enhancing the brightness/contrast or applying a slight color balance adjustment to set the mood of your scene.
Step 2: Creating the Plasma Orb
- Create a new layer (Shift+Ctrl+N) and name it “Plasma Orb.”
- Select the Elliptical Marquee Tool (M) and hold Shift to draw a perfect circle. Place this where you want the orb to be in your scene.
- Fill the selection with a bright, vibrant color that suits your plasma effect using the Paint Bucket Tool (G). A neon blue or green works well for plasma.
- Deselect the selection by pressing Ctrl+D.
Step 3: Adding Glow to the Orb
- Double-click the “Plasma Orb” layer to open the Layer Style dialog box.
- Apply an Outer Glow with a blend mode of Screen, choosing a color that matches your orb. Adjust the size and spread to create a soft, ethereal glow.
- Add an Inner Glow to enhance the orb’s core brightness. Use a lighter version of the orb’s color, set the blend mode to Lighten, and adjust the size for a subtle inner shine.
Step 4: Enhancing the Orb with Brushes
- Create a new layer above the Plasma Orb layer and name it “Orb Details.”
- Select the Brush Tool (B). Open the Brush panel (Window > Brush) and create a custom brush with scattered strokes, size jitter, and angle jitter to simulate energy flowing around the orb.
- Using a bright color, paint around the orb with the custom brush to add dynamic, swirling energy effects.
Step 5: Refining the Scene
- To integrate the orb with the scene, create a reflection in the lake. Duplicate the “Plasma Orb” and “Orb Details” layers, merge them (Ctrl+E), and flip vertically (Edit > Transform > Flip Vertical). Position this layer below the original orb, aligning it as if the light is reflecting in the water.
- Reduce the opacity of the reflection layer to blend it naturally with the water, and apply a Gaussian Blur (Filter > Blur > Gaussian Blur) to simulate the water’s surface distortion.
Step 6: Final Adjustments
- Adjust the overall scene’s color and contrast for coherence. Create an adjustment layer for Color Balance or Curves (Layer > New Adjustment Layer) and tweak the settings to unify the orb’s magical light with the rest of the scene.
- Add a slight vignette effect by creating a new layer, filling it with black, and applying a radial gradient set to transparent in the center. Adjust the layer’s opacity for a subtle darkening at the edges.
Conclusion
Congratulations! You’ve created a mesmerizing fantasy scene featuring a plasma orb above a tranquil lake. Experiment with different orb colors, glow intensities, and scene settings to craft unique variations of this magical landscape.
This tutorial demonstrates the power of blending modes, layer styles, and custom brushes in creating fantasy art in Photoshop. By adjusting the steps and exploring Photoshop’s vast toolkit, you can expand this project into more complex and personalized artwork.





Wow..this is great…methinks this will inspire me to get my creative head back on as I have not done anything for some time now…AND it was one of your Tuts that got me started in the first place. I just love the peacefulness about this picture, yet it is vibrant. Thanks for sharing it with us.
i love it, really cool tut liza
Great job Liza! I really like this one too! The rings around the girl are really vibrant and fun! I can’t wait to try it sometime.
I really wish I could design
Great job as always Lorelei.
great tut ,still got a long way to go before I could start doing these great fantasy art worx. heheeehee
Hmm, thanks for this, Lor! I think I might use the idea for the ‘magic circles’.
Wow, thanks for the feedback guys, I am really happy to hear you liked it, I was not sure if the tutorial is actually any good when I posted it, well, hopefully it will get accepted on Good-tutorials
I absolutely love this tut!!i’m definetly trying this one!!i’ll post my results once i’m finished!!thanks a lot Liza!!!
I would have seen more blending on the girl and a darker background, but I think it’s very helpful to some people!
Ok so I had time today to do this one at work. I really liked it. I want to maybe use this same image to do something with wings or add a bit more.
http://i32.photobucket.com/albums/d30/Gethsemaney/plasma2.jpg
Ravenwolf, your stars and cycles look far better than mine, they have more of a natural flow and I really love it. i think u could have blended the girl in a bit more, the image is very colorful and stands out, BUT – overall i think you have made an awesome job!
Nice result guys! I need to get me some sparkle brushes those look so fun! ^_^
@ Lorelei, Hehe, it’s funny to hear you say “the girl” because that is me..lol.
Anyway yeah I was thinking it seemed like it may be too bright, but I forgot to fix that, your image was originally with dark clothing, so it didn’t look so out of place. I will have to change that sometime.
@ Dreleen, yeah they are fun! I have some planet-y ones with stars and moons etc. and thanks!
Nice! can i get those brushes?
@ Nike; you can find those brushes at Deviantart in the download sector.
@ Lorelei; this is definately one of you best tutorials Lorelei. There are some good effects used in this fantasy art which will become helpfull among the most of us in making other designs. Actually no remark on this tutorial. Great job
@ Ravenwolf. I also like your creation alot. Maybe you should have used a bigger landscape so the composition would be a bit nicer. But overall also a great job.
This site is fantastic. Here’s mine:
http://xs117.xs.to/xs117/07284/mystic.png
Thanks tammsyshere for your comment about our site and for sharing your result. it looks stunning, i really love the colours you added, looks more vivid. the stars looks more like snowflakes to me, but it is really really beautiful!
Thank you! You deserve a lot of credit though, for sharing your creativity and making things so easy to understand. Much appreciated.
Nice work there indeed tammsyshere. You’ve used a nice model for this tutorial. Hands for example want to touch the water etc…
Maybe those stars are like Lorelei said, not really stars, and some of them are too bright. But that’s nothing compared with the whole art.
Hope to see more of your work soon
Thnx for the good Tutorial. i usually dont try the more advanced tutorials but on this one i whanted to make a try. I ended up a bit offroad, but this is the image i created whit inspiration from your tut..
hi, The tutorial is lovely, Props due,
I had a little go myself and wanted to change it to make it different, it goes a little something like this,
Oops just realised I have untidy edges, must work on the cutting from background thing!
i found this tut on good-tutorials and i havent wanted to make a graphic in a while and this made me really want back in the swing of things. the lighting sucks i know but otherwise i think it came out alright, im glad i made it take a look
http://img340.imageshack.us/img340/6415/lightfromseaun4.jpg
wahhh that coool i will try it later thanks dear for your hard working ^^
I just love this tutorial ^___^ Really easy to understand even for a newbie like me and awesome results. Thx Lorelei I’ve tried it out and this is what I came up with…
http://img64.imageshack.us/img64/5241/forestfantasysb0.jpg
hello again. here is mine, i know i have to make many adjustments but thanks for the great tutorial
Great tutorial.
I used it to create this:
http://img.photobucket.com/albums/v103/fblue/heroes.jpg
hy
which software r u using to make this kind of pics
plzzzz mail me the link of that software
Does anyone know how to get in contact with Lorelei ?
I need to see if she can work on a project I need done asap!!!
Please tell her to hit me up at : mylifeinfiction@gmail.com
Please forward this to her Thank You!
ej*
LORELEI!!! This might be your best tutorial yet!!
I am going to try this one today here in Mexico and see how it comes out. But its absolutly awesome and well detailed.
Great tut. However, I am still unable to reproduce the glow effect behind the girl. I feel some steps are either assumed or I am just too daft to follow the steps. In step 9, I don’t know how to remove the overlapping layers of the clouds as suggested. In step 22, I was unable to get the levels instruction to do anything to my image (no change with the settings made). If only someone can advise on how to get the great glow behind the image, that would be sufficient for this novice. All I keep getting from the lighting effect is a spotlight on the image (from the front). I got other steps (the glow rings, stars, etc). Thx for your help.
What I do for glows sometimes is dupe in a new the layer, shrink the image a tad so it sits behind the original, go into the layer options put an outer glow on and adjust the color and other settings like size and opacity.
BTW its always good to post a pic of your project and its issues so we can see what you are talking about.
Thx. I will try that trick. I am not sure where or how I missed that step in the original tut.
Umm I’m new here ^^ but here’s my outcome ^^’: http://img509.imageshack.us/img509/1377/plasmaelfox8.jpg
Nice result but the strong lite doesn’t really do with the dark muted back ground. Id tint her down a bit and blend her in a little more. Love the render btw
Thanks for the comment ^^, the render is from Planet Renders.
Well this was my first attempt at this one. I still have much work on cutting out hair to make it more realistic but overall I am happy with it. I wasn’t sure which brush set to use and grabbed one that wasn’t too bad and I need to work more on the perspective of the rings to create a more realistic effect but here it is …
I could not do the plasma circles! I was doing so well until it came down to the plasma circles!!!!
hey man i like what u did , but make it more faded so i blends in a little , but sweet effects !
Pretty much followed the tut down to the letter, I can tell because I have more white near the center of the light source and stuff that it causes over exposure, so if your not using black like the tut has you may want to correct for that.
For the stars I found that just setting a size jitter, a opacity jitter, and scatter was a quick way to get it done, so hope nobody actually sat there and plotted them one at a time .
Here is what I came up with.
http://www.photohost.org/gallery/data/500/2405plasma.jpg
obisi, if your layer is cropped and has a shape, just make sure this layer is selected, go to Layer >> Layer styles >>Outter Blog and apply even the default settings by just checking the box near “outter glow” and pressing okay. i love your result, its quite original and well done!
Dark Chibi, welcome to the forum I think the glow circles are maybe not glowing enough but i really love ur result, it’s glorious!
and my 2nd try using a character from that new movie… stardust I think its called.
http://www.photohost.org/gallery/data/500/2405plasma2.jpg
I like the second one how she is coming out of the water…
and yeah i did “plot” the stars..but I am meticulous like that have to get everything where I want it.
hy lorelei.i’m realy happy that you apreciate my work…..thast’s a picture of mee & my husbant on our wedding day…..i think i’ll thry some more of your tutorials…i reall love the fantasy tutorials …thank’s for them…bye
This is my effort.
I didn’t get the stars right.
http://i103.photobucket.com/albums/m134/cfc7cfc/mylene.jpg
hi, great tutorial but i was get stuck at flatten the image..what does it mean “flatten the image” and how to do it..
This is what I came up with. I didn’t use all technics Lorelei has put in her tutorial and added some by myself.
http://users.telenet.be/W2H-clan/Just%20another%20fairy%20tale%20+%20smallest.jpg
I enjoyed doing that one. I had a bit of trouble with the lighting as my colours are lighter it looked burnt out. It would have been better if I had centred it better as well.
http://www.jaynee.co.uk/images/lorelei/dylanofthedeep.jpg
I was messing around with this Tutorial A+++ Love it!!!
I noticed the smudges on there faces, and I thought it was when I did the circle blur. However it isn’t, I made multiple saves so I could go back and correct it, but I was just messing around… Thanks!!
http://mheinjr.googlepages.com/Liss-Hearts.jpg
Well, this *is* the first time I’ve made a fantasy art graphic– but it turned out much better than I’d expected. Though it isn’t as good as yours, Lorelei. -_-
http://i206.photobucket.com/albums/bb239/ginryuu_kurochan/Animegurl90.jpg
I think I used lighter shades of blue… and the fact that the girl is initially colored in a shade of violet played quite a lot of havoc with the outcome. It doesn’t go well with the lovely atmosphere around. -meh- Still, I love the way it seems as if she’s emerging out of the water, and is suddenly surrounded by sparkling bands. ( woot for my imagination, lol~! )
Jade, it looks really great for your first time, in fact it would have been an awesome outcome even for 10th time i think the circles should have been slightly brighter (or higher contrasted) but other than that looks superb! thanks for sharing your work with us!
Hiiii
i just want to know which software you were using for this pictures effects,i mean the tool
plzzzz mail me the name n link for that software/tool
thanx
Heyy! Amazing tutorial Took me a while to figure out how to transform the cirlces so they look fuller ( and still didnt grasp it)
This is my outcome:
http://img146.imageshack.us/img146/8625/girlcopybj6.png
the biggest problem for me is the rings. just to make it more colored and more neon-like i suppose lol
thanks for the GREAT tutorial lorelei, this is my FAVORITE i have learned so far in photoshop
This is what I have I throw. This is my work.
I ask pardon if I have lacked a lot to it paginates. I have been very busy.
Lorelie I first saw this tut in August and thought WOW.. you have some extremely interesting photo tuts, ideas, suggestions etc.. I can go on and on…
I have my hands in so many different things, however, I am back to learn what I should have months ago…
Keep up the good work, you and your team!!!
well liza i finally followed the tut
woah wow thats so darn awesome y hvnt u added the sparkles??
Totally WOW SandeRRednas – very nice, I like
Here is my final version after a few tries… I did not get the glow I wanted but I think everything else turned out pretty ok
http://i21.tinypic.com/8wxgdu.jpg
Hi
I`m kinda new to this too
Liked this tut a lot, tnx Lorelei
Well anyway, her`s may outcome…
http://i251.photobucket.com/albums/gg296/Edzha87/Projekti/Liiva3.jpg
Congratulations, I really like the design that has done so. ^__^ I liked also that of Hayden Panetierre. And others, thanks.
My like More tutos Fantastics news, thanks.
can u please send me the psd file for this grt work. i am a beginner in photoshop please help me.. i tried this one bt could nt manage to get even the half of it. please pleas please send it to me(tubuhereatgmaildotcom)
Here is what I got, tell me guys what you think!!
http://imagenerd.com/uploads/photo2N8jF.gif
*dies*
i lov the glow effect and blue is my fav color.Good job.
Just came across your blog today, which subsequently led me to this page. I absolutely love this tutorial and I’ll be sure to try it out
Also, glad you allow others to post it as long as a link is included, i’ll be sure to add it onto GirlGamers It’s awesome. Think I’m gonna have fun
Your tutorials are awesomeness…cant wait to try them!!!
Once again thanks for the tut, I started it out ok, then somehow I went in forty other directions on it. I had problems with a few things but it was because I am still learning the tools and options. But I wanted to post the image I made but I have yet enough post to do so. So I will have to make a photobucket account for it.
Untill then you can see it at my website…http://www.club-warzs.com
Nice…
Simply put…THANKS!
You’ve given me food for thought and opened my creative horizons.
Great tutorial !! easy to use and very practical 😛
thanks.. check out my pics on my website !
GREAT JOB MAN
U ROCK
EASY O US N UNDERSTAND
AND THANKS ALOT
it is great
I have some trouble with the rings, when I transform and add perspective I got 2 rings the one before transformation and the one I transformed?!? I did it like it says in tut, I tried to restart photoshop even restarted pc but every time when I try to add a percpective I end with two rings, and the first one I can’t erase. Can anyone explain why this is happening? Pleeeeeeeseee
9.Remember to remove the parts where layers turn to be on top of one another.
how do you do that?
Gut!
Gute Arbeit hier! Gute Inhalte.
Hi. thanks for this 😉
HI… I got lost with the star brushes step… im fresh new and i dont know how to get them… i download a star brushes set but i dont know what else to do.. i tried to open the zip file but i really dont know how to use it… i was so happy doing the others steps of the tutorial..lol
Please help me… i really want to finish it!!!
great work guys how amazing the image as well as your brain also man.but how can i down load vedio tutorials please tell me i want to grow in my work
I’m brand new to photoshop. Was following along until step 9, “Remember to remove the parts where layers turn to be on top of one another.” How do you do this?
I’m stuck at this: http://img410.imageshack.us/img410/5662/22538357.jpg with my cloud layers crisscrossing.
Comrie19, just select one of the layers that crisscrossing now, and using a big eraser tool brush with soft edge, remove the bits that lay on top of the other layer. it does not have to be all that neat since there will be background that will also help to “swallow” the mishaps. Also, you might want to add stronger glow effect to your girl, because you didn’t crop it very good, but adding stronger glow will help to fix this problem because them you won’t see the edges so clearly. Hope this helps, you are doing a great job so far!
A really nice creative result in this tutorial. As aretouch artist I love coming to these tutorials asI learn so many useful and interesting tips and techniques!
Hi.. A great tutorial. but, I’m stucked @ almost last but the hard part.
@ Step 17, I created the ring, adjusted the ring, but now when I use eraser tool for removing farther part behind the girl. It starts to fill up that ellipse?? I’m using Photoshop CS3. Can pls someone help?
Could you fix some of the broken image links please? finding out how you did everything myself makes everything so much harder
hi, can you help me for step 10 or 11. because i can’t do step 10 or 11 can you give me detail step.
thanks.
Very nice creative works, great tutorial..
Thank you for sharing 🙂
????
Amazing work with the strokes.. KIU! 😀
thank you for sharing i am from myanmar
i like your tutorial.thank you very much
please contact me.i want friend to you
Thank U for publishing the tutorial it;s use for meny photoshop learner’s
it is wonderfull
I had a lot of fun with this tutorial! It covered basic things i didn’t know and then it showed me some tougher techniques that i’m still tweaking.
thanks for your time to do this!
very nice this one and
very nice use of photoshop.
Thanx, i worked it out on myself and its looking really fantastic.
lovely effects of photoshop
thakns
Muito legal esse tutorial ! Parabéns ao autor ! Usei com meus alunos e foi um sucesso ! Abraço. Prof. João Marcelo – RJ/Brasil
Fun and pretty tutorial. It was amazingly easy to reproduce and alter, thanks!
Thankyou so much for that .. I made one from this and it was almost same Thanks
Hi! I love this tutorial but I have a problem, when I have the circle I use the eraser but the line move where I move the tool. HELP ME What I can’t do?
sorry for the words I can’t talk english good, thank you
estubo fabuloso gracias por subir este tipo de material
great job.
Loved so much when see the expression on canvas very good job well done
Great tuorial, thank you so much!
http://fc06.deviantart.com/fs46/f/2009/213/5/5/Water_Priestess_by_nat_rat.jpg
Thank you! I would now go on this blog every day!
Thanks
Interesting, I`ll quote it on my site later.
Zoran
Thx! This blog really helps me get improve of Photoshop! thx..
cool- i love this- its so helpful and cool looking
WOW…..THATS A NICE TUTORIAL I REALLY LOVED IT.AND IT HELP ME FROM EDITING SOME COOOOOOOOOOOOOOOL ELLIPSE THANKS!!!!!!.
Good tuts.
great tutorial..thaks so much..
Interesting tutorial. I always accept this type of job. Thanks to u. please send this type of tutorial. thanks
Greatings, Where are you from? Is it a secret? 🙂
Rufor
I had gone through your tutorials. It was fantastic a have no words to describe it.Thanks very much for the this tutorials page.I think people who cannot afford to to join classes can do so in this tutorial.
great, thats a nice tutorial, and i’m waitng more your editing. thank u …
Great tutorial
Thank you for sharing 😀
beautiful effect, thanks Lorelei
hmmm…Great tut thnx 4 this ……….
woooooooow…..really nice tutorial.
Can I take it and post it in another forum pleaseee??
To be honest we don’t allow re-publishing of our tutorials, as Google can penalize us for duplicated content, but it’s fine if you translate it to another language and post elsewhere, with a link back to us, as original source. Thanks!
Wow it’s worked out verry good for me thanks for the great tutorial. I’ve been get better in photoshop by it.
It’s a fantastic tutorial. I wish, I can do the same will be great day for me.
what photoshop do you use?.
AHH!! Does anoyone have that pond photo she uses? That link doesn’t work, and it’s the perfest picture for the photoshop i’m doing
I made that tutorial back in 2006!! So I really don’t remember where I took the water pic from.. 🙁
wow nice output
..,.,.! ! .,.! _i’Tz so amAzinG grEat joB .,.,. !!! moRe blesSing’s tO coMe.,.,!!!
GoD BLess Us.,.,.!!!!
Thank You so much for sharing.
Amazing Technique, I Liket It, ThankZ I’m From Indonesia
topas its great topas project tussi great
Amazing, very usefull, thanks for sharing my friend
Good Evening!
Can someone please kindly explain to me how to do steps 9-11.Thanks!
Alice
LOVE THE TUTORIAL
but i was wondering how you remove the parts where the layers are overlapping
the cloud layers….
LOVE THE TUTORIAL
but i was wondering how you remove the parts where the layers are overlapping
the cloud layers…. step 9
Nice Effect.
i hope more simple tehnic, because i was beginning…… tq so much..
nice !!:-) thank 4 sharing
wow… thanks for this tutorial i’m doing it and nearly finish…
im kinda a beginer…so how do you crop? :
y yo q se lo q dice esta todo en ingles
foo
Hello
Thank you for this fab tutorial, I’m in the middle of making a wedding present but i am stuck on the lightening part of the instructions. The image of the settings is too small for me to see, please could you give me the settings? The subsequent image is also small.
Much appreciated.
uapik tenannnnn…….TOP!
Thanks….Lorelei.
hmmmm…excelent
thanx…
simple and very nice above all very thoughtful and artistic manipulation.
gudwork indeed
hi! verry nice i could’nt not to try it but my result was not like you the glow of the circles didn’t work i really was Disappointed because it’s look very nice and i want to know how to do it
amazing,great thenx for this useful tutorial
Nice tutorial… found many new things while making mistakes 🙂 its fun…
thanks.
helps please
can someone tell me how to change the background color n how to use GRADIENT TOOL…
im becoming mad
plz..
kushal_aujayeb@live.com
or
http://www.facebook.com/KUSHAL15
how downloaded this programm?
nice one..
I really like and appreciate your blog post.Thanks Again. Cool.
Great blog article. Cool.
wow , superb . fabulous effects.
Great tutorial, please update the image links the last few steps the images are no longer available. Can’t see the settings.
Thanks.
Also, on your final image your blues are vibrate almost like a lightsaber style rotoscoping. Mine nor the one girl who posted the picture came out like that. Maybe because I could not see those last few steps. Who knows. Hopefully the OP still checks this.
Great tut loved it. I dont know if you read this anymore but the last few steps are missing and the lighting effect gets applied to the girl image if you dont know what the filter settings are and she kinda looses her skin tone. Can you fix this tut?….much appreciated, great job!
looks very cool!
Very nice tutorial. I’m going to give it a try.
guys the three pics, i cant see get their numbers and values, so I cant apply the lighting effect… plz help
its make me so easy to understand….thanks lorelei
alone but happy dil
Nice tut, but the last 3 pics are too small to see??
HELP PLEASE
Can’t open the tutorial images of “lightning effect” and the one after them!
I found so many interesting in your blog especially its discussion. keep up the good work.
Whoa. That was a good read. I will digg this web-site for later.
I like your style.
that is so easy thank u
Great work done, try social media agency and
buy targeted soundcloud followers
I have noticed you don’t monetize your blog, don’t waste your
traffic, you can earn additional cash every month.
You can use the best adsense alternative for any type
of website (they approve all websites), for more details simply search in gooogle:
boorfe’s tips monetize your website
This is awesome !!This is SUPER helpful.I’ve been curious about this. Lovely tutorial too.
WOW!!! that’s a really informative article, I am very much inspired. Your tutorial helps me as like my mentor, i am looking forward to more informative article form you.
This information was really amazing and informative. Thank you so much for sharing this blog with us.