Embossed stylish text tutorials are everywhere, but this one is the perfect one for beginners. Want a really stylish embossed text effect? It’s been over 2 months since the last Photoshop tutorial I posted, but I have great news for you — I am back online with loads of new stuff to show you, so stay tuned for all our upcoming tuts!
Today, we will begin with this lovely text effect, and as most readers request, we also release the PSD for download for only $1. The PSD is for learning purposes only; you can incorporate it into a project for a client, but you cannot directly resell this file.
Enough talking; let’s get started.
Embossed text effect photoshop


Step 1. Preparing Photoshop Canvas.
Create a new Photoshop file (Ctrl + N). We are using 600*400 size here, but as always — yours could be a lot bigger if you need it.
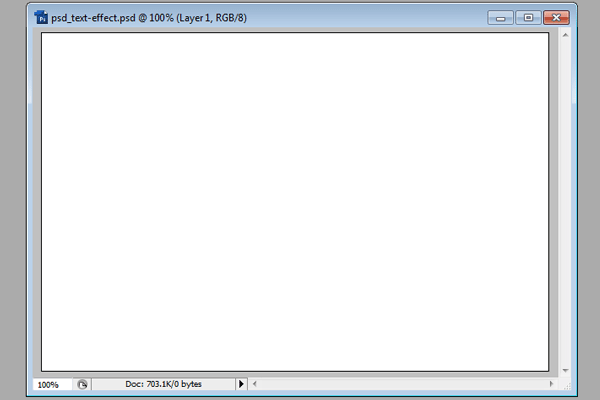
Using the Paint Bucket tool, fill the canvas with dark grey-blue color — #535559.
Step 2. Choose the font.
I am a big fan of all the fonts that were used and famous back in the ’50s, so my all-time favorite font will probably be “Bello.” It’s not free, but you can purchase it online. Please note that the font will NOT be included if you purchase the PSD file as we cannot distribute commercial fonts. So, if you have Bello font, select it and type your word in a big letter. We used 188pt here.

Step 3. Adding Layer Styles.
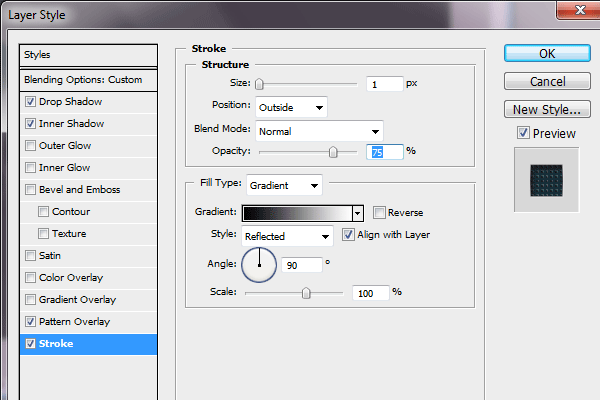
While your text layer is still selected, go to Layer >> Layer Styles, and apply the following settings…
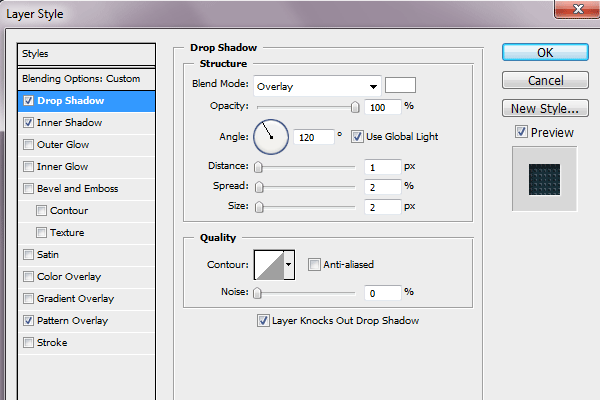
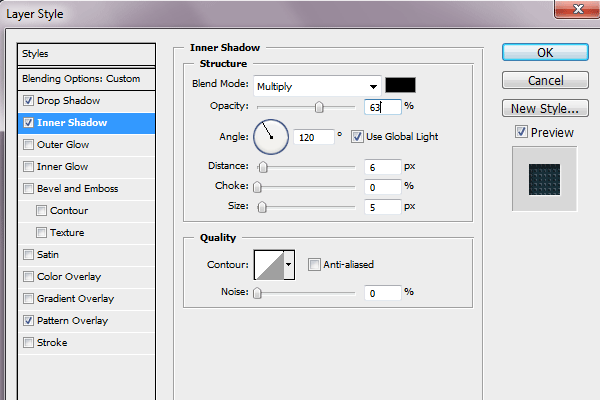
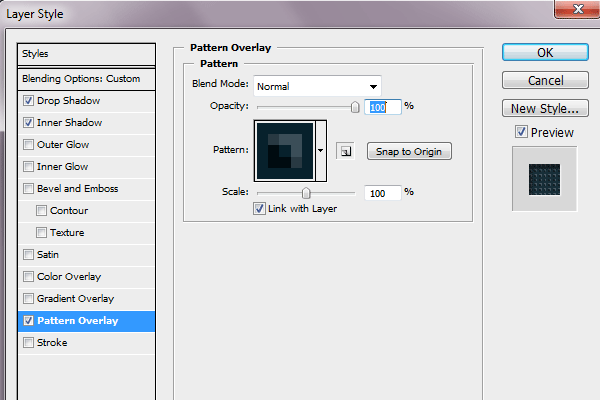
Now the background texture. We will be using the pattern we created ourselves, and if you purchase the PSD file, it will already be included in the style.
Lastly, we will add a 1px stroke with a gradient overlay to give the text more depth.
We have got this far with all the layer styles applied correctly. If your result differs from what you see here, go back and check if all the settings for layer styles have been applied correctly; so far, it’s only the technical part, so you should not have any problem.

Step 4. Adding Depth to Canvas.
It’s the era of web 2.0, and having a flat canvas can ruin any effect, no matter how beautiful it is, so if we want our product to pop, it has to have some depth. That’s why we will not go back to the base canvas (if it’s locked, double-click it on the layer palette, and press OK to unlock). Go to Layer >> Layer Styles, and apply the following settings:
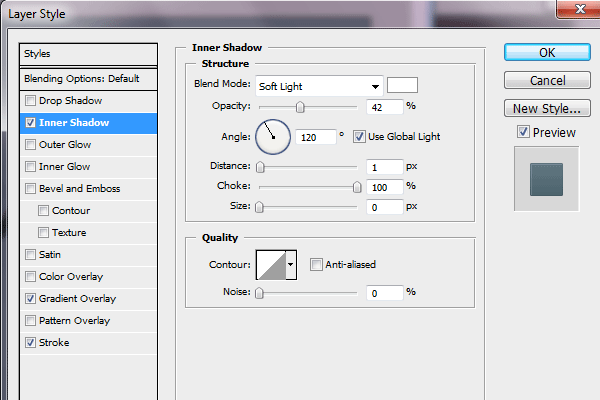
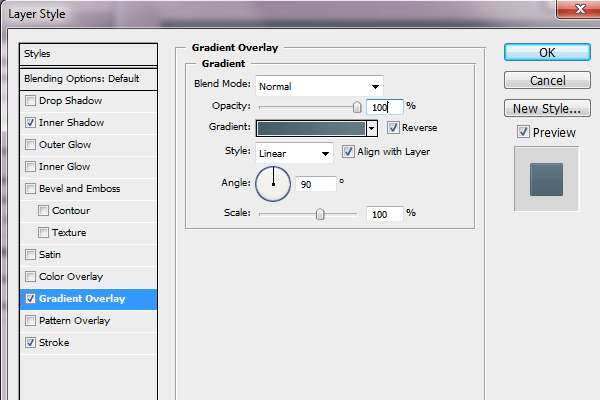
For the gradient, use the following colors:
1. #667c85 as the light blue
2. #475e68 as the dark blue
Here is what we have got so far…

Step 5. Adding Gloss
Press “Ctrl” and click on the text layer in your Photoshop layers palette. This will load a selection of text.

Create a new layer on top of all the others. Using the gradient tool, from white to transparent, draw a line from the top of the text to the bottom. This will add a mild yet visible gradient to the reader.
Using the elliptical lasso tool, draw a circle, as you can see in the picture below:

Go to Select >> Inverse to inverse the selection and press “delete” to delete the gradient’s rest. This will leave the gloss only on the upper part of the text, like this:

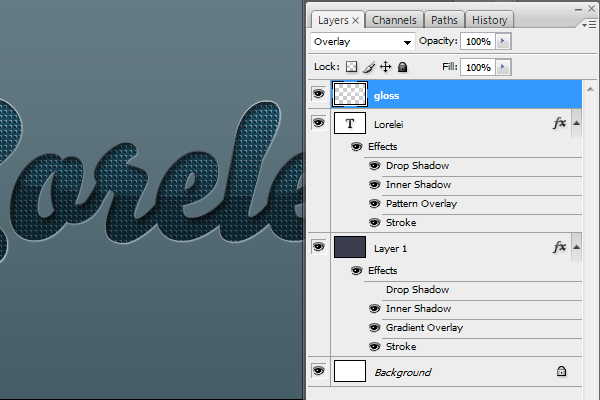
Now, to give it a pleasant and natural touch, set the layer opacity of the gloss to “Overlay” (please see below):
Step 6. Adding Sparkles
The next step is adding sweet sparkles all around the text. This will give it a more depth, dreamy and elegant feel. Create a new Photoshop layer on top of the rest. Using your Brush Tool, pick the 27pixel brush with a soft edge, and using the white color, chaotically spread some dots on the edges of the text.
Set the fill opacity of the dots to 70%. Switch from “Normal” to “overlay” mode.
TIP: only apply the dots where the the stroke of the text is white, this will enhance the light effect.
So far, if you have followed the steps closely, you should have received this:

We also added some more glow with different brushes, but be sure not to overdo it because it’s better to have less gloss and too much of it.
I hope you enjoyed this Photoshop tutorial, and be sure also to check our other Photoshop tutorials and subscribe to the feed. If you’d like to learn faster, please buy the tutorial’s PSD file for only $1.00. When you complete the checkout, click the “return to merchant” button — the download will start automatically. If, for whatever reason, the download did not redirect you, please leave a comment below or email us, and we will send you the file ASAP. Thank you!

Text Version
Enhanced Tutorial: Creating Embossed Text with a Metallic Glow in Photoshop
Overview
This tutorial will guide you through the process of creating stylish embossed text with a metallic glow effect, perfect for logos, headings, or digital art. We’ll utilize layer styles, gradients, and blending options to achieve a sophisticated look.
Requirements
- Adobe Photoshop (any recent version will do)
- Basic knowledge of Photoshop tools and interface
Step 1: Setting Up Your Document
- Open Photoshop and create a new document. For web use, a size of 800×600 pixels with a 72 dpi resolution is sufficient. For print, consider a higher resolution (at least 300 dpi).
- Fill the background with a dark color or gradient to make the metallic glow stand out. A deep blue or black works well for this effect.
Step 2: Creating the Text
- Select the Text Tool (T) and type your desired text. Choose a bold or thick font for the best embossed effect. Fonts like Arial Black or Impact are good choices.
- Adjust the font size to fit your design. For this tutorial, let’s use a font size that fills a good portion of the canvas, ensuring the details of the emboss and glow effects are visible.
Step 3: Applying the Embossed Effect
- With your text layer selected, go to the Layers panel and double-click to open the Layer Style dialog box.
- Select “Bevel & Emboss” to add depth to your text. Use these settings for a subtle, realistic embossed look:
- Style: Inner Bevel
- Technique: Smooth
- Depth: 100%
- Direction: Up
- Size: 5 px (adjust based on your text size)
- Soften: 0 px
- Adjust the shading to enhance the metallic feel. Set the Angle to 120° and Altitude to 30°. Experiment with the Gloss Contour presets to find one that complements your design.
Step 4: Adding the Metallic Glow
- Still in the Layer Style dialog box, select “Inner Glow” for a subtle inner shine. Choose a light color that matches your desired metallic look (silver, gold, etc.). Set the Blend Mode to Screen, Opacity to 75%, and Size to around 20px.
- Add an “Outer Glow” to create the impression of light reflecting off the metal. Choose a similar color as the Inner Glow, set the Blend Mode to Screen, Opacity to 50-75%, and adjust the Size to achieve a soft, radiant effect around your text.
Step 5: Refining the Metallic Texture
- For added texture and realism, click on “Satin” in the Layer Style dialog box. This adds depth and complexity to the metallic finish. Use these settings:
- Blend Mode: Multiply
- Opacity: 20%
- Angle: 19°
- Distance: 21 px
- Size: 27 px
- Play with the “Contour” settings under Bevel & Emboss for additional texture nuances, enhancing the embossed effect.
Step 6: Final Adjustments
- Fine-tune the overall look by adjusting the layer’s Fill opacity to 0%. This will make the text color invisible, leaving only the layer styles visible for a more pronounced metallic and embossed effect.
- If desired, add a background layer with a gradient or pattern that complements your metallic text to complete the design.
Conclusion
You’ve now crafted a piece of text that not only pops off the screen with its embossed effect but also shines with a sophisticated metallic glow. This technique can be adapted and modified with different colors, textures, and layer styles to fit various design projects.
Experimenting with the settings and incorporating additional elements like sparkles or background textures can further personalize your creation. Photoshop’s layer styles are a powerful tool for bringing text to life, and mastering them can significantly enhance your design capabilities.


Thanks for the detailed explanation. It’s really helpful.
Great tut! Thank you very much.
W0W, amazing tutorial, thank you Lorelei! You are GREAT!
amazing! possibly the best and most useful tut on this site. I learned so many things in this one.
Thanks for this post. The effects used will come in really handy for things like logo design when I’m wanting something to stand out on a page.
It help me a lot.. 😀
Thanks
Bluehost Coupon Promo Code
Very good blog post! I’ve been a lurker on your site for a long time but just wanted to let you know I like your posts.
hey alan 😉 call me, 928-444-6405
I tried to buy the tut but the page couldn’t load 🙁
I tried to buy the tut but the page couldn’t load 🙁
Amazinª!
Worked perfectly! Here’s my attempt: http://habbocustoms.com/uploads/1326676835zTriick2.png
Hmm it seems like your website ate my first comment (it was
extremely long) so I guess I’ll just sum it up what I wrote and say, I’m thoroughly enjoying your blog. I too am an aspiring blog writer but I’m still new to everything. Do you have any tips for rookie blog writers? I’d genuinely appreciate it.
Amazing will try it out, buy real spotify followers and very well explained,
buy instagram followers
this original post was 8 years ago, is it still avail for download? I really like the pattern overlay you built
This is really an amazing tutorial for me. I learn a lot from this blog. Many many thanks for sharing with us.
It help me a lot..
Thanks Dude..
Amazing I will try it out!!!
Many many thanks for sharing with us. Stylish Embossed Text for the detailed explanation. Good and Special Collection. I’m just finding something like that.
Exceptionally great web journal post! I’ve been a prowler on your location for a long time but fair needed to let you know I like your post