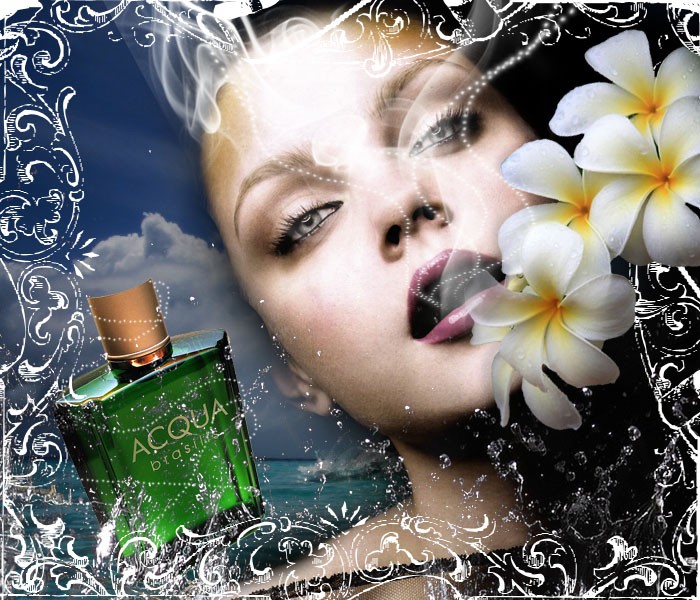
Time to play a bit with shapes. Use any twirly shape you wish, we used free ones (sorry they are so old that I have no idea anymore where did they come from). Once selected, and using the white color as foreground, apply them in all 4 sides of the photo…

…so that you will have a nice Victoria style frame all around.
Don’t worry if it doesn’t look too smooth — it’s not supposed to be! Just give it a funky-glamorous look, the way you see on most French adverts, commercials and packs.

Step 6
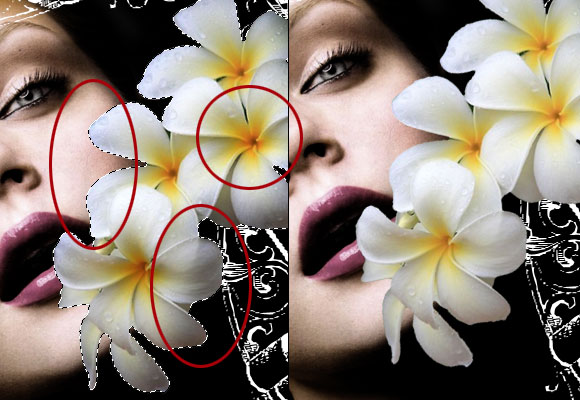
Now take the flower (link is at the beginning of the tutorial), and crop the flower so that you will be able to easily extract it from the background and apply without having any pixelated sides. Since cropping is a pretty much basic Photoshop technique we will not demonstrate here how to crop, hopping you will read about it in one of our basic tutorials.

Step 7
Once cropped properly, apply the layer with flowers unto the composition you are creating. The idea is that one of the petals is located IN the lady’s month; now before you go ahead and assume this is something rude — we will have a point for this one later on, just be patient and continue reading.

Step 8
Select the flowers layer, and using the Burn Tool in your Photoshop, go over the flowering adding a little accent and depth — on the sides, edges and inside the flower. The burn tool will darken the areas you are working with, just be sure to use a Soft Brush of at least 100px and do not overdo this effect. This is something hardly visible and unseen, yet it adds depth and makes our image less shallow.

Step 9
Now, in our attempt to make the flowers layer organically blended and less shallow, we are going to add a shadow. Select the flowers layer by pressing Ctrl and selecting the layer from layers panel. Create a new layer and place it underneath the flowers layer. Fill the selection with black color.

Step 10
Press Ctrl + T to transform the selection of the shadow layer, and after right-click — use the “Skew” mode. Pull the edges of the bottom selection a little bit towards the sides but be careful not to overdo this effect — most Photoshop beginners tend to think that when following a tutorial — the more is the better, that is not quite always right.


Amazing tutorial. I generally don’t like to comment on tutorials but this was really too good to keep me silent. Keep it up!
dear Lorelei
your tutorial is more stunning than the french perfume.
thanks 4 all
thank you 🙂
Hay Lorelei!
Awesome tutorial, I really like that, the cool color combination but the “flowers”, they really don go with he theme. Anyway good job!
Regards,
Web Design Company London
You are probably right about the flowers, i had thought about it too, frankly… thank you for the feedback!
Will try better in my next tuts 🙂
Clear, inofraimtve, simple. Could I send you some e-hugs?
QjmRHK mgrsrikzjelr
GwKIXR rbnupwjsppip
Great tut, been looking for something like this. Thanks!
Wonderful! Really wonderful tutorial& very helpful. Thanks for sharing this creative article.
I agree that the flowers are out of place but I totally love the result, heads up!
Nice poster, but not stunning. Good work tho!
this is absolutely amazing!
Very nice tutorial….
I will do this tutorial with my own ingredients but you are an excellent teacher and artist. I have bookmarked you and wish you great success in your enterprise.:-)
Nice tutorial thanks! for shearing!
Nice tutorial thanks for shearing!
Great tutorials ! Its look like so much buty ! Thank you so much for sharing !
Nice theme and very easier to learn. This is a new idea in my Graphics part. I think you will success again for this tutorial.
Very interesting… with simple techniques ! attractive result !
Very good tutorila – I appreciate how all steps are explained in a very clear way. I enjoy also the “compariosn” in case the difference wouldn´t be noticed at once! Wonderful!
Usually I don’t learn post on blogs, however I wish to say that this write-up very forced me to check out and do it! Your writing style has been amazed me. Thanks, very nice post.
Thanks for giving your ideas. I’d also like to convey that video games have been actually evolving. Modern tools and improvements have made it easier to create reasonable and fun games. All these entertainment video games were not as sensible when the actual concept was first being experimented with. Just like other styles of technologies, video games too have had to evolve by way of many generations. This itself is testimony to the fast development of video games.
Nice theme and very easier to learn. This is a new idea in my Graphics part. I think you will success again for this tutorial. thanks for sharing this.
Give us more…
Hello just singned up, thought i should say hi!
Fantastic tutorials ! Its look like so much buty and very easier to learn! Thank you so much for sharing !
Keep up this type of post…
It’s a nice collection! Thank you very much for your awesome post!!
Amtsgericht Bad Hersfeld Aktenzeichen: HRB 2126 Bekannt gemacht am: 18.02.2010 12:00 Uhr
Veröffentlichungen des Amtsgerichts Bad Hersfeld In () gesetzte Angaben der Anschrift und des Geschäftszweiges erfolgen ohne Gewähr.
Löschungen von Amts wegen
30.12.2009
Florian Grotehans Vermögensverwaltungs-GmbH, Bad Hersfeld, (Am Baumgarten 12, 36251 Bad Hersfeld).
Die Gesellschaft ist gemäß § 394 Absatz 1 FamFG [b]wegen Vermögenslosigkeit[/b] von Amts wegen gelöscht.
Florian Grotehans Vermögensverwaltungs GmbH vermögenslos!
thanks for shearing…Nice tutorial
Now I am also feeling interest to make this type tutorial.
Really a creative and excellent work. Keep it up. Thanks for sharing.
Thanks for sharing. Great tutorial.
Nice tutorial and it’s very helpful for new learner. thanks for sharing
Great work and we get more experience to seen the tutorial. Thanks for sharing……..
What a nice tutorial!! Thanks for sharing this.
It’s a great photoshop tutorial. I have a photoshop related business and the tutorial help our business work. Thanks for sharing.
I am very much new to your website,as i have satarted my own bolg i.e http://www.abestfashion.com, check out
latest mehndi designs
I found this post to be very informative and helpful. I will have to recommend you to my friends. I am very thankful to you for giving this post.
hey this one is very easy to understand and do!! im jumping right into it!! thanks for the article mate 😀
It’s a good Photoshop tutorial. I actually have a Photoshop connected business and therefore the tutorial facilitate our business work. Thanks for sharing.
Hello Julie,
I am not an expert photoshop user but have started learning using different tutorial links. I got a website which give pretty detail information on Photo Editing. You can try yourself also by Google and youtube.
Wonderful! Really wonderful tutorial! Thanks for sharing this creative article.
Nice tutorial thanks for shearing!
nice tutorial thank you for sharing, I am still learning about this
very nice article, thanks for sharing
A great and informative post about designing a stunning french perfume advert poster. I have an e-commerce shop and for my business promotion, this post helps me a lot. Thanks
I got great lesson from u, thanks
I really benefited from this good resources that you have shared here. thanks a lot for this best idea
Great collection and nice shoot, Thank you so much.
It’s a great photoshop tutorial. I have a photoshop related business and the tutorial increase my skill that help our business work. Thanks a lot.
I really appreciate reading such kinds of blogs. Thanks for sharing such informative articles.
I want to have half red half black hair, like here.
Can I use photoshop to try it on my face?