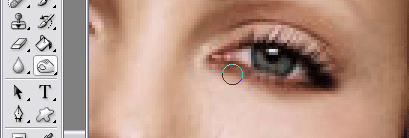
After finishing our work around the eyes, this is what we have accomplished…

Now, using the same technique, go with the Burn Tool over the lips line, as if you are applying a lipstick, “burning” the lips to a darker hue.
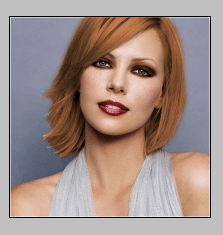
Create a new layer. Select a Brush tool with a sharp edge. Make sure you are using same round size as the eyes of the figure you are working on.
Apply two “stamps” over the eyes, as shown on the picture below. We used #0348f9 bright blue colour, rather unnatural hue for eyes. Remove the remains of the round brush from the eye lids.
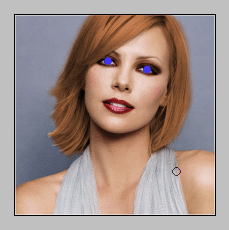
Set the Blending mode of the eyes stamps to “Color”
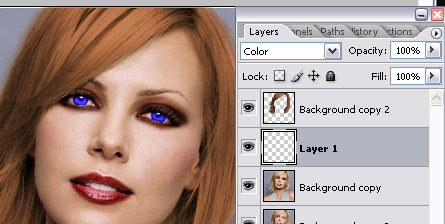
Take any picture of flower, preferably on transparent background (clipart) or any easily removable background, and add to the picture, that
way, so that it will cover all the flaws of your recent manipulations. It can be bad edges of hair (as we have here) or anything else.
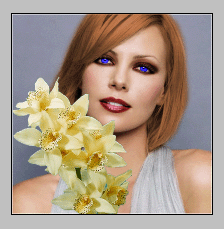
Add it in front and also as a background, in order to create the illusion of blooming garden all around the face, so that the flower won’t look as if it doesn’t belong.
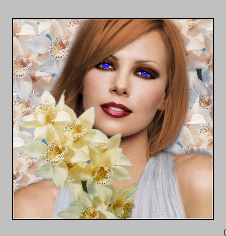
Since now, all the layers of the picture are of a different hue, lightening and quality – Flatten the image.
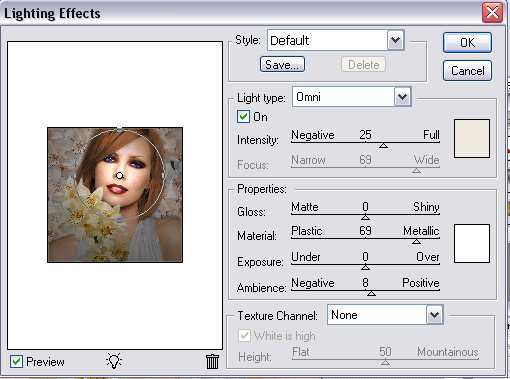
Go to Filter >> Renders >> Lightening effect and apply this omni spot only over tthe face. Use light bieje colour for the light spot.
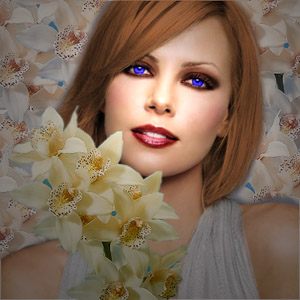
That it is, this is your glamorous result. Ain’t the photo looks superb?
Pages: 1 2




thats nice, i ll try to edit some of my gfs photos, if ill find some ~_~
good tut
Great tut lorelei, I’m new here to the forum and this is my first ever photoshop photo “manipulation” that I have done. I greatly enjoy ALL of your tut’s :heart: and have decided to post my pictures with the help of this particulat tut.
Before:
http://img238.imageshack.us/img238/3708/charlizetheronbeforewi8.jpg
After:
http://img303.imageshack.us/img303/5213/charlizetheronafternz3.jpg
What do you think? Lips might be too dark though… 😉
Cinnamon,
welcome aboard…..looks good….but as you might have read allready, i always have to comment on something….. :blush2: …..
Try to redo the lips, im not talking about colors, but if you look good you can see that some parts of the lips are forgotten…
enjoy your stay and hope to see more from you……
Thank you for the warm welcome ocean-cruiser. :party:
And a big thanks for your imput. The lips were a bit hard for me for some reason :nea:. I kept on “burning” but it just would not come out right. The more I “burned” the more darker and uneven it got. I will try to redo that photo and repost it. However I do love critisim, wheter it be good or bad, I feel like that is the only way that I can better myself.
Thanks again
Heres my try at it :
http://img151.imageshack.us/img151/2663/sarahdandg7.jpg
I have one comment to say about this tutorial (and actually, your attempt too, Dan)
The eyes just don’t look natural. In Lorelei’s they are way to bright a shade of blue. I think the same goes for yours, Dan, they’re just too bright. It doesn’t look right, and ruins the whole photo for me.
Cheese,
I think thoose colors are choosen to give the tut a clear effect, so that everyone can see good what has actually been done.
When someone really would manipulate a picture of someone, then he/she can choose the appropiate colors ofcourse.
http://img87.imageshack.us/img87/6411/manivs1.jpg
i love ur tut so much i done a quite different 2nd 1
Maybe this Hollywood glamor stuff isn’t for me. I still find your eyes an unnatural shade of green. I love what you’ve done with the hair and earring. Those are very well crafted.
I’m new here, this is my first post actually, so I’m sorry for not introducing myself first. I probably will in a moment.
I followed the tutorial and added my own little bits and wanted to show them off because I’m quite pleased with the transformation. =)
Before…
http://img.photobucket.com/albums/v210/Bleebloo/touchup4a_before.jpg
…and After
http://img.photobucket.com/albums/v210/Bleebloo/touchup4b_effects_noglitter.jpg
What do you think? =)
Delpha,
Nice work….the only thing i dont like (but thats my personal taste ofcourse) is the green around the eyes.
Nice job….keep them coming!!
yeah the eyes look verry nice…theyre assorted with the background ….(not sure if i used/typed the word corectly 🙂 )
I know, PhotoShop is unbelievably expensive. I suppose Elements is good because a lot of people don’t use it for business but just for personal home use. Shame that it’s only elements of PhotoShop though, as the whole package is really great. I wouldn’t know what to do without PhotoShop! No more random images to fill my spare time, no more sigs and avatars, no more web layouts… So many things would be harder to do. <3 PS. $599 is a HUGE price though.
Thanks for the comments Lorelei and Mike! I really appreciate them. =)
Elements is THE worst thing to ever be created.
Ever.
great tutorial, im still working on mine, im editing one of the pictures of the models of my brothers company
hm what can i say…not so good tut at all….
You shuld use grim on wery affull girls…So you culduse blur on her face to hide some stufs, and so on….i used to fix photos, and changing colors isnt the best eay to make it cool.
P.S sory for my language.
http://10.10.7.8/eye.jpghttp://10.10.7.8/eye%20copy.jpg
but anyway…this is on fast hand…:D :cheers:
Small but nice effects there, Gvinpin. I’m glad you changed the lighting, because the original one didn’t look so good. I like the reflective qualities of the eye very much.
wow! some of that stuff isn’t glamorus.i seriously doubt i would see some of them in a magazine. So i made one myself and got a same pic as someone else. Oh and i really don’t understand what ya’ll are doing. I mean ya’ll are giving them like these midevil goth looks…….that are’nt very attractive and some of ya’ll have missed hairlines and even a whole part of hair. You don’t need to make such a dramatic change it can be just simple lil things like i’ve done in mine.REMEMBER!!!! YOU HAVE BLENDING MODES,OPACITY, AND A FILL!!! USE THEM and i don’t see any reason to change the background cause that looks even more fake.If i ever do see these in a magazine(pics LIKE thes) i would definately know someone has messed with them>>>
BEFORE http://i79.photobucket.com/albums/j128/alma_mokey285/Charlize_Theron_1.jpg
AFTER http://i79.photobucket.com/albums/j128/alma_mokey285/after.jpg
okay so i changed her eye color, her hair is a lil more blonde instead of that “washed out” blonde, made her lips a lil more pink, gave her a lil bit of a tan, and softened her face!
Gvinpins, great effect, small but very interesting, i like the idea, very original!
alma_mokey285, yeah, once we all found a good effect we tend to overdo it and turn it into a more gothic effect, only because when it’s used too little, sometimes it”s hard to see with a naked eye and people are getting confused where and what was changed. i really like what u did, the way u added some tan and the lips look a lot more glossy this way, a real shot from the magazines, i love your result!
@alma_mokey285
u right. This was kinda the story i was going to post this evening 😛
Glamour shots are always smooted and adjusted in color, contrast etc. But its glamour style not “ow they photoshoped style”. Added and deleted body parts (hips, belly, breast) Smooth skin, bright eyes and a “glowing” look thats how most pictures are done.
I like what you did too the picture but eventhat is kinda too much. Cause the base is already a glamour picture. (skins is very smooth tho gj)
I’d like to know where everyone got the clipart to add to their creations. I’ve been attempting to do this creation but can’t finish it. Any help would help.
Well, I use free photo stocks or resources offered by DeviantArt
http://browse.deviantart.com/resources/
http://www.morguefile.com
thanx i love this tutorial i tried it and this is how it came out what do u think?
before:
http://i52.photobucket.com/albums/g19/bvbb12/iStock_000001459163Small.jpg
after: http://i52.photobucket.com/albums/g19/bvbb12/pretty1.jpg
brendi, thanks for sharing ur result… i dont know if it’s just me, but the only difference i see is that the pic “after” is a lil` ligter and has blue eyes. it does look good tho, very natural!
I noticed alot of people were having problems with the lips, so here’s a few tips for you, that have worked for me even now.
Go to your picture and make sure that layer that has lips on is selected.
Press Q, and make sure your brush is set to pure black and pure white (If you press D that does it), and make sure Black is your foreground (press X to switch forground from background)
Now with a soft edged brush paint those lips, try not to get the teeth if they are there.
When you are done painting the lips black (which shows as a transparent red) press Q again, and now you see a selection line (marching ants).
Hit Ctrl + Shift + I and now the lips is the item selected.
Mess with it in Color Balange or Image Hue/Saturation to what you want.
Now get the burn tool, set it to shadows, make it soft, and make it big so it’s not streaky.
In burn set it to shadows and play with the exposure, we don’t want pitch black but we want it pretty damn dark, Perhaps 75, it depends on the darkness of the picture.
Burn the area on the lower lip at the bottom and then closest to the teeth.
Burn the area on the upper lip at the top and then closest to the teeth.
Now a new thing, each lip has a bit of shine (unless they are chapped to hell). Now let’s bring that motha trucka out!
Grab that Dodge tool like as if you were hobo on a hamsandwhich.
Set that sucka to highlights.
NOW DODGE THAT LOWER LIP ON THE SHINE!
Ehem… Sorry, got a little excited there.
But you should see the shine on the lip and then just bring it out a bit with the dodge tool.
Brush size will be harder with a mouse, just use the size of the biggest point of the shine.
With a tablet, it’s easy, make it a little over the size of the biggest shine and then just use your pressure control to get that perfect shine.
There you go, some awesome lips, hoped that help.
First of all:
HELLO EVERYONE!!111!
i’m new around here!
my name is Michele, but everybody call me “mik” 🙂
i’ve started to use photoshop few months ago, and right now i’ve learned pratically the basics… so dont be too bad with me :pardon:
before:
http://img244.imageshack.us/img244/8656/angelinaprimaid0.jpg
after:
http://img244.imageshack.us/img244/9369/angelinadoposd5.jpg
Excellent job, the hair is a little rough, although I enjoy the fact you darkened it, but other than that it’s really nice, I like just about everything including the girl.
I must say it does look nice but the picture that you used started out good to begin with….what about doing this with someone that does not have prefact skin and has part of their face in the shadows.
Can some one take a “normal” person and make them a “cover girl”? If you can post a tut on that one!! Ugly Duckling to Beautiful Swan anyone?
http://img255.imageshack.us/img255/1709/glamour4jz.jpg
http://img364.imageshack.us/img364/2186/glamour25zh.jpg
I think that the spotlight effect makes it look like she doesn’t have a neck in this picture moreso in the edit I did of it. Her hair looks alright, too, I suppose. I’d tried earlier and made Kate Bosworth’s hair purple. It was kind of funny. The magic wand tool seems to not want to work for me, and this was the best I could do. I think it’s alright.
I focused the light more to the left of her as well; I didn’t do it right on her face and I made the beige a little browner. The burn wasn’t working on her lips very well, until I realized I hadn’t duplicated the first image, but all in all it’s alright. I’m going to try again, though, definitely.
Edit: Here’s my next batch, altered first:
http://img267.imageshack.us/img267/7…kteeth29sl.jpg
http://img267.imageshack.us/img267/2…ckteeth4dp.jpg
I realize their eyes are unbelievable, and I need to work on that. I didn’t want them too bright, or not noticeable. I guess there’s no happy medium!
I dont understand how to do the hair…=( its bugging me!
Yeah! The hair is really hard. You just have to tweak it a bit with the magic wand. I only have Photoshop 7.0, so maybe it got easier in the newer version… but for now, you just have to click and hope for the best. If it selects too much, then ctrl+z it and try to click closer to an already selected portion of hair.
The hair I did for my chick came out surprisingly well. I tried to make it a little brighter, but I didn’t expect orange. And the areas I thought I’d selected with the wand (but didn’t because it’s a cruel, cruel tool) came out the natural blonde, but it looked a lot more real that way.
I had a hard time with Magic Wand tool; sometime it would highlight part of the hair, sometimes part of the hair and face, and sometime the hair and background – never just the hair. Then when I went to Image >> Adjustments >> Hue / Saturation it wouldn’t color the entire picture, just the part I used the Magic Wand on. Can someone tell me what I’m doing wrong?
Way too much makeup 😛
I dont like it ^^
So I gave it a go…while keeping the original background…here’s what I did….
Original
http://i170.photobucket.com/albums/u275/Aleezayz/headshots_003_3.jpg
And here’s my so-called “glamor shot” edit…
http://i170.photobucket.com/albums/u275/Aleezayz/headshotscopy.jpg
wow very nice aleezay ! your outcome is great !
Very Quick Edit using this Tutorial
Title says it all, really.
http://i14.photobucket.com/albums/a304/clokverkorange/kedralynn_original.jpg
I didn’t touch up the hair, skin, or background simply because my goal was to see if i could use this tutorial to speed up my photo retouching process. The edits you see here took a grand total of five minutes, and much of that was figuring out what size to save the file in.
hi all, I need help, I have a photo and want to add some effects but Im just the begginer in photoshop and cant do some cool stuff, can someone add to my sister photo some effects?
@sleepy
The best way to learn is to just jump in and start editing.
An easy way to start photo retouching is to play only with the filters and layer transparencies until you get a good feel for what does and does not work with each other. Here’s an easy tutorial to punch up an image (sorry I don’t have the time to screencap)
1. open your source image
2. duplicate your background layer twice. (right-click the layer and click “duplicate layer”).
3. hide the background layer (bottom most layer)
4. select the bottom layer and choose “Filter -> Blur -> Gaussian Blur”.
5. Use these settings – “Blur – 2.5 pixels”
6. Hit OK
7. Now select your upper layer and change your blending mode to “overlay”.
8. The image should darken and blur slightly. With your uppermost layer still selected, hit “D” on the keyboard to select the default colors (black and white).
9. Select “Filter -> Distort -> Diffuse Glow” and use the following settings
Graininess – 0
Glow Amount – 5 (between 4 and 7 depending on the resolution of your source image)
Clear Amount – 9 (between 7 and 12 depending on the resolution of your source image)
10. Hit OK.
11. You’re done!
This is an easy and quick way to make a “glamour” shot, and it’s so easy you can even macro it and apply it to a batch of stills to give them a studio look. Examples are below –
Original on the left, edited version on the right.
http://i14.photobucket.com/albums/a3…_original2.jpg
http://i14.photobucket.com/albums/a3…_original2.jpg http://i14.photobucket.com/albums/a3…lynn_edit2.jpg
Hope that helps!
@Aleezay, to be honest, and im not saying this to be rude, but i liked the original pic much better ^^
There are to much contrasts in your edited one, and the colors looks…. weird :S
But just keep practising! 🙂
@Clokverkorange, your pics are awesome!!! 😀 Great job!
Clok I like your first editing, your second is too bright. But the first editing, is freakin awesome, I love it.
As you already know, that’s a different technique…I like that blown out highlight look just because no one else is doing it. For a while it was my signature style until I started using purple in everything. Now recolors are my thing.
I think that your original photo actually was a glamourshot from the beginning 😉
Anyway, the edited pic looks abit pixlated and colors dont really match. But just keep on practise and you’ll get there 🙂
he forgot to turn down the noise option on the glow filter 8)
it is a good tut I just dont like the blue eyes lol other then that its good!
i think this is over done 😉
heres mine i did my own picture lol be gentle 😉
i didnt do the lips as i dont like how they turn out
before
http://i12.photobucket.com/albums/a220/Sugarxsweet/park%2016%20july%2006/Photo-0207-1.jpg
AFTER
http://i12.photobucket.com/albums/a220/Sugarxsweet/PhotoShop/pic.jpg
Awesome.
In my opinion a great work.
http://img461.imageshack.us/img461/8428/untitled1hv9.jpg
here’s my go at it:-)
what do u guys think??
wow… great tut lorelei… thanks… very nice.. im gonna try it later…
that effect is awesome…i love it!
Hi
very good
mersi ( thanks )
http://img169.imageshack.us/img169/6807/lucylawless006tk3.jpg
I agree, it’s really a weel done job.
And I must say VERY VERY good again: I thought it was rather difficult to improve Charlize’s look! :inlove:
thanks again… I’m just taking note of the coolest fxs in order to be able to show some work of mine (if only I can barely meet the very high level of this forum).
ciaoCiao!
rk73
like the makeup part, because you show a different style to do makeup.
wow……
I….can’t say anything, you all the best 😀
Oh my god, this is crazy, like totally makeover… :wacko:
The blue eyes don’t really match to me in your tutorial. A bit to bright perhaps.
But the rest is awesome !
i don;t like to be too poud of my work, but this is what i call glamour::airkiss:
http://imagehost.rophotoshop.com/pics/fab0eb246c7f04df67c383e328f6f021.jpg
Well since my first one wasn’t all that great, I decided to try again. Here is my second go at it. I’m new and am trying to learn so any assistance would be greatly appreciated.
Before:
http://img170.imageshack.us/img170/4705/92998036jo4.png
After:
http://img98.imageshack.us/img98/628/98400032ij9.jpg
My attempt at this tut. 🙂
http://i34.tinypic.com/qyafx4.jpg
That’s what I call great results.
I made these so long ago I do not have the originals anymore, just the after photos uploaded on a few sites.
Here is an origial that I think I only slightly edited:
http://www.photohost.org/gallery/dat…032hottie2.jpg
And here is after “glamor”
http://www.photohost.org/gallery/dat…urplefinal.jpg
http://www.photohost.org/gallery/dat…issvicious.jpg
Here is a black & white that I colored:
http://www.photohost.org/gallery/dat…usfix2-med.jpg
Here is a good one I have the before & after
Before:
http://www.photohost.org/gallery/dat…newsmaller.jpg
After:
http://www.photohost.org/gallery/dat…atrina2nd2.jpg
This is a good Before & After because she was kissing a mirror so I edited only one image, people thought for awhile that she had a hot sister or something and did not notice it was a mirror 😛
http://www.photohost.org/gallery/dat…32katriana.jpg
Those are all some of my friends, have not seen most of them in ages though.
A simple yet great effect. I could have some fun with this .
Thanks
the before picture is MUCH BETTER ; the eyes are too blue! its too fake! try fake irises
hey im elsie plz help me im diein to fix my pics for free without payin i have no money ….plz tell em where i can sign in or something
Whenever you start work with a photo make sure you keep a copy of the original, always make a duplicate and work on that layer. This is pretty nice work. I’d use a different color for the eyes, but excellent tutorial nonetheless.
Una restauración fotográfica muy interesante, pero los ojos parece un poco falso.
thanks for this, i had fun! It is really simple except for the hair part, my magic wand tool grabs way too much material.
Nice tutorial, but I’m not sure about the eyes they make the image look unnatural, maybe a more subtle tone of blue rather then purple?
grat tutorial, thank you so much for posting!
Gorgeous!!!
I would like to make the similar one using our local country girl next time. Thanks for your tut pal.
thank y
That’s very good Job… would you please tell me the name of this photoshop ??! =) & Inbox me in my email ! Thanks
I have checked your website and i’ve found some duplicate content, that’s why you
don’t rank high in google, but there is a tool that can help you to create 100% unique articles, search for; Boorfe’s tips unlimited content