Time to give your composition a juicy angelic touch.
Make a new layer, and place it above the landscape background yet under all the other layers. Select the “Gradient Tool” and use one of the default “rainbow” gradients that come pre-installed with your Photoshop…
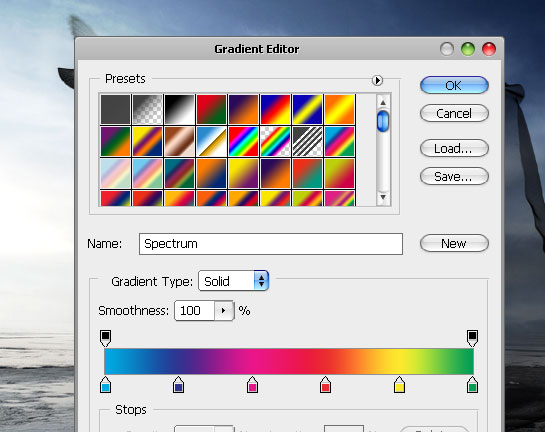
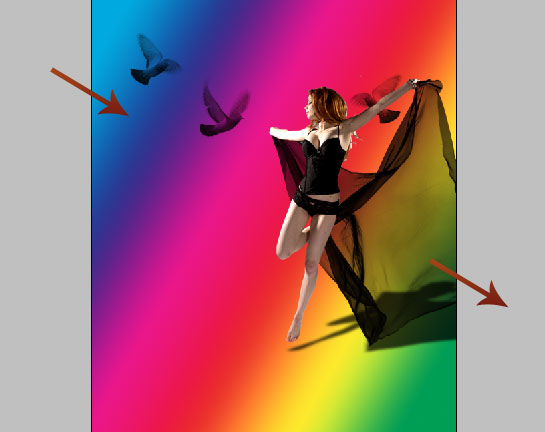
Draw a line for your gradient, using approximately the same angle as you see below.
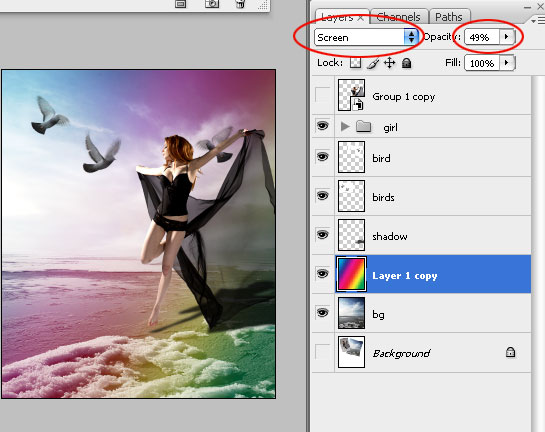
Set this gradient’s blending options to “Screen“, and Opacity to about 50%. I am putting the entire layer’s panel on the preview so that you will see which layer should lay wherein case you messed up anything by now..
This time we will add our trademark shape which you have already seen in our other very popular tutorials — Surfing Girl fashion tag and design your Perfume Billboard.
You can download the shape here.
Make a big twirly shape on your canvas.

Press Ctrl + T, and upon Right mouse click, chose “Distort“. Position the shape in a way that will “wrap” around the girl under a natural angel.
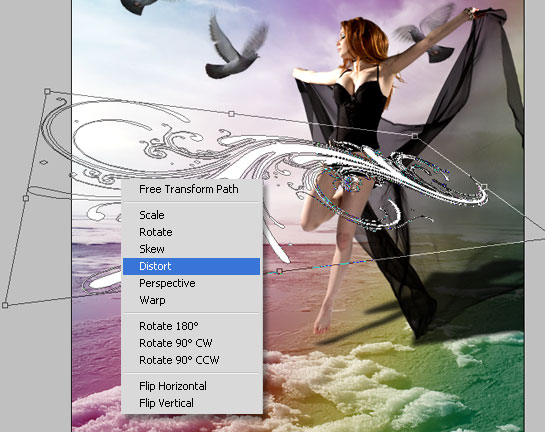
Press Enter. Now, rasterize this shape and using an eraser tool with sharp edge remove the pieces of the shape that lay OVER the girl’s body. This is what it should look like by now.

Make sure you do it really neatly because if you erase too much, or too little, the effect will no longer be so natural, so it may help you to set the shape’s opacity in Photoshop to 50%, so that you will be able to see it semi-transparently, and that way you have far fewer chances to mess things up. It’s also highly recommended to work at zoom, even if your quality on the screen won’t be good, you have better chances to erase accurately, compared to working in 100%.

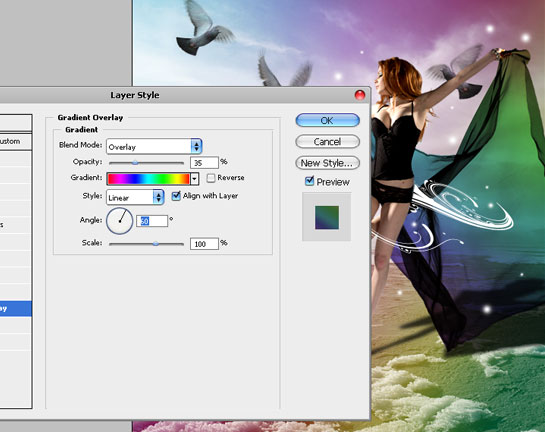
Next step. Let’s make the veil colorful as well, to give our composition a more cheery touch. Select the veil’s canvas, go to Layer Styles >> Gradient Overlay and apply one of the defaults, classic rainbows that come pre-installed with your Adobe Photoshop. Set the Opacity to 35% and Blend Mode to “Overlay“.
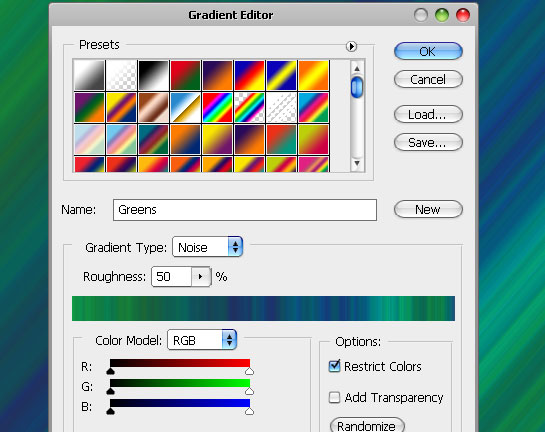
Still, we want more effect to enhance our composition. Create a new layer and fill it with this gradient, it also comes by default with all the CS Photoshop versions. Set gradient type to “noise” to achieve this kind of effect.
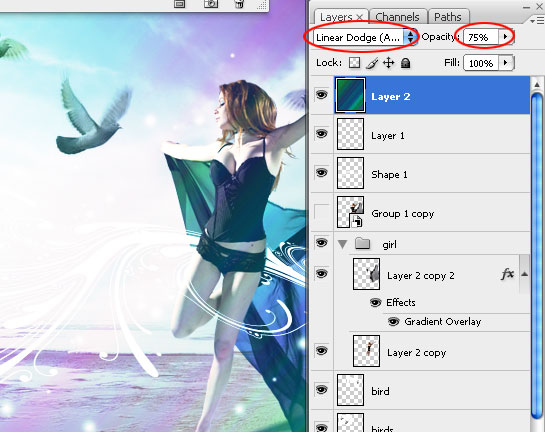
Make sure this green noise gradient layer in on top of all the others, and set it’s blending mode to “Linear Dodge” and opacity to 75%.
Next, we want to add glowing little combs, flying around the girl. Using a soft-edge brush and #ffffff (white) color, apply a few chaotic dots across the canvas, but try to keep them close to the girl and the shape, as if they fly about them.
That’s all, this was our “Silentio” Fantasy Art Photoshop Tutorial for today. If you wish, you can also add rain using our previously posted tutorial about Rain Photo Effect. Hope you enjoyed this tutorial.
Please subscribe to our feed to make sure you will never miss a fantasy art tutorial or one of our exclusive freebies. Email subscription is also available, just remember to verify your email by clicking the link that will be sent to you automatically.

If you decide to purchase the PSD, please remember to click “return to merchant’s website” button after the checkout, as this will redirect you to the download page (download starts automatically). If you forgot to do it, please contact us and we will send you the files within 24 hours.


Great tutorial and amazing result.
Thanks, I’ll definitely try it 🙂
This is beautiful, I’ll try it for sure.
This is FRantastic Fantasy!!!!! Gorgeous!!!!
Thanks for sharing.
I really loved this tutorial, i totally agree, pigeons make the most magestic bird! GO BIRDS!
This is really good. I’m trying it right now, but I’m having a hard time getting that shape into my image. How do you do it?
Fenomenal!Una retoque fotografico muy logrado
Brilliant got tohave a go
[…] View Tutorial […]
Excellent work i love fantasy art
[…] Efecto Fantasía […]
What a great bit of work. thanks for sharing this.
[…] 53.Design Unforgettable Fantasy Art Wallpaper “Silentio” […]
muy bueno el tutorial man gracias por subirlo
[…] and Read More: pswish.comSHARETHIS.addEntry({ title: "Design Unforgettable Fantasy Art Scene "Silentio" – Lorelei", url: […]
why is she missing part of her right arm?
[…] Unforgettable Fantasy Art […]
[…] Unforgettable Fantasy Art […]
[…] Unforgettable Fantasy Art […]
[…] Unforgettable Fantasy Art […]
[…] Unforgettable Fantasy Art […]
[…] Unforgettable Fantasy Art […]
[…] Unforgettable Fantasy Art […]
[…] 16.Unforgettable Fantasy Art […]
i liked this tutuorial, i also edited some things to it. just as anon said a small part of the lady’s right arm is missing ( but that doesnt matter much.. i had no other problems besides that.
[…] Unforgettable Fantasy Art […]
My like the people that fly like the angels.
I so wish you would do all of your tutorials again but as a video Tutorial I do so much better when I can see it and hear step by step.Will you ever or do you have already? If so can you direct me to where.Then you should so put it on utube. would love a step by step video tutorial please.
[…] Read more Share and Enjoy: […]
Hey!
Great work, loving it.
One question:
Who’s that model?
Would be glad if you answer via email 🙂
Xaron
| MoC – MK – CM – CC – CPC – XGrapix – PBB – HCCB |
Thanks for sharing very nice art work with us. This is fun static work and very nice color selection.
Really great post here. I can see the effort and time you put into this… and I love the approach you took to lay it all out. Great fantasy scene looks brutal.
So beautiful design, wish you would do all of your tutorials again but as a video Tutorial I do so much better 🙂
Awesome tutorial!